

Composting is a great way to recycle organic waste and improve your garden soil, but pests like rats, raccoons, and flies can quickly turn it into a problem. To avoid this, follow these key steps:
- Avoid meat, dairy, and oily foods: These attract pests with strong odors and slow decomposition.
- Cover food scraps with brown materials: Use dry leaves, cardboard, or straw to trap smells and deter pests.
- Maintain high compost temperatures: Keep it between 135°F and 160°F to speed up decomposition and repel rodents.
- Use rodent-resistant bins: Opt for metal or reinforced plastic bins with no gaps larger than 1/4 inch.
- Place compost away from food sources: Keep it at least 10–20 feet from bird feeders, pet bowls, or fruit trees.
- Control moisture levels: Aim for a dampness similar to a wrung-out sponge to avoid odors and nesting spots.
- Secure indoor compost bins: Use tight-fitting lids, stainless steel containers, or store scraps in the freezer.
- Bury food scraps deeply: Cover them with 6–12 inches of brown materials to mask odors.
- Inspect and repair bins regularly: Check for gaps, chew marks, or damage and fix them immediately.
- Use safe pest control methods: Try peppermint oil, cayenne pepper, or traps instead of harmful poisons.
1. Don't Add Meat or Oily Foods
Steer clear of tossing meat, fish, dairy, or greasy leftovers into your compost pile. These items can produce strong odors as they break down, which are like magnets for pests such as rats, raccoons, and even bears. Ashley Andrews, an Extension Specialist at the University of Nevada, explains:
"A compost pile is an active ecosystem... compost can create a source habitat for garden pests or annoying insects that can ruin your barbeque."
Fats and oils also create problems by coating organic materials and blocking airflow. This slows down decomposition and leads to oxygen-poor (anaerobic) conditions, which can release unpleasant gases like ammonia and hydrogen sulfide. To make matters worse, most home compost systems don’t reach the high temperatures - between 130°F and 140°F - needed to kill harmful pathogens like E. coli that might be hiding in raw meat.
Focus on plant-based scraps instead: vegetable peels, fruit rinds, coffee grounds, and yard waste are all excellent choices. These materials decompose efficiently without drawing unwanted critters. If you’re adding food scraps rich in nitrogen, make sure to cover them with three parts carbon-rich materials like dry leaves, cardboard, or straw. This "carbon blanket" helps trap odors and speeds up the process. For eggshells, rinse them thoroughly to remove any protein residue that could attract pests.
Keep your compost pest-free by avoiding animal products and greasy foods altogether. If you need to dispose of these items, consider using municipal composting services or trying Bokashi composting instead.
2. Cover Food Scraps With Brown Materials
Whenever you add kitchen scraps to your compost, make sure to cover them right away with a thick layer (about 4–8 inches) of brown materials. This simple step not only helps mask odors but also keeps pests like fruit flies and raccoons from sniffing out or accessing the waste. Nadie VanZandt, an Extension Master Gardener at the University of Vermont, highlights the importance of this practice:
"Each time you add food scraps to your compost, cover it entirely with a layer of brown materials. This step is essential to prevent foul odors."
For extra protection against rodents, you can either maintain that 4–8 inch layer or bury the scraps at least 12 inches deep . Brown materials - like dried leaves, shredded cardboard, straw, torn newspaper, or even pieces of pizza boxes - are ideal for this purpose. These carbon-rich items do more than just trap smells; they also improve airflow by creating air pockets, which helps prevent the smelly, anaerobic conditions that can slow down decomposition. By minimizing scent exposure, this approach also keeps pests at bay.
To make this process easier, keep a stash of dry browns close to your composting area. Shred them into pieces roughly the size of playing cards for better coverage and airflow. If you’re using cardboard, remove any tape, labels, or staples beforehand. Aim to keep your compost pile as damp as a wrung-out sponge, and add more browns if it starts to feel too wet .
A good rule of thumb is to maintain a 3:1 ratio of browns to greens for smooth, odor-free decomposition. This balance ensures the carbon-to-nitrogen ratio stays within the ideal range of 25:1 to 30:1, speeding up the breakdown process. And during rainy weather, don’t forget to increase the top brown layer to 6–8 inches to keep your pile from getting waterlogged.
3. Keep Your Compost Hot
Keeping your compost pile hot isn’t just about speeding up decomposition - it’s also a natural way to keep pests at bay. When your pile heats up to temperatures between 135°F and 160°F, it creates an environment that rodents, insect larvae, and disease-causing organisms simply can’t tolerate. In other words, a hot compost pile does double duty: it repels unwanted visitors and breaks down organic matter efficiently.
Nick Andrews, an Organic Vegetable Extension Specialist at Oregon State University, highlights the role of heat in composting:
"Those microbes power decomposition - and heat. To kill weed seeds and many pathogens, Andrews said a pile should reach 130–135°F."
This heat is generated by thermophilic bacteria, which thrive when temperatures stay between 105°F and 140°F. To keep these bacteria happy, aim for a 3:1 ratio of browns to greens, maintain 60%–65% moisture (think of a sponge that’s been wrung out), and turn the pile regularly. The size of your pile also matters - it should be at least 3 feet by 3 feet by 3 feet (about 1 cubic yard) to generate and retain enough heat.
To sustain these high temperatures, turn your compost weekly during the summer and every few weeks in the winter. Use a thermometer to check the center of the pile, and if the temperature dips, mix in nitrogen-rich materials like grass clippings or coffee grounds to bring it back up. Turning the pile not only redistributes cooler material from the edges into the warm center but also disrupts any rodents trying to nest.
For best results, always bury new food scraps in the hot core and cover them with browns. The combination of high heat, moisture, and proper layering creates an environment that’s far from inviting for pests. Animals looking for a dry, quiet spot will steer clear of the hot, moist conditions of an active compost pile.
4. Use a Rodent-Resistant Bin
After setting up proper waste layering, the next step is securing your compost with a rodent-resistant bin. Choose a bin with openings no larger than 1/4 inch to keep mice out, and no more than 1/2 inch to deter rats.
Metal bins are highly effective since rodents can’t gnaw through them. If you’re using a plastic bin, reinforce it with 1/4-inch galvanized hardware cloth for added protection.
Nadie Vanzandt, Extension Master Gardener at the University of Vermont, offers this advice:
"A sheet of 1/4-inch hardware cloth a few inches larger than the bottom opening of your compost bin will serve as a barrier against small rodents that tunnel from underground."
Make sure the bin has a tight-fitting lid that locks securely. If it doesn’t lock, use bungee cords, barrel bolts, or a heavy concrete paver to keep it in place. Seal any gaps larger than 1/4 inch around the lid with weatherstripping to close off potential entry points.
For added security, consider using tumblers or elevated bins. If you prefer a ground bin, place it on a concrete pad, patio stones, or coarse gravel to discourage tunneling. Position the bin at least 2 feet away from wooden structures or thick vegetation where rodents could hide.
5. Place Compost Away From Other Food Sources
Once your bin is secured, where you place it plays a big role in keeping pests at bay. If your compost is too close to other food sources - like bird feeders, pet bowls, or vegetable gardens - you’re essentially inviting pests to stick around. As researchers from Cornell University point out:
"Often animals are attracted by other food sources such as bird feeders, outside pet food bowls, garbage cans, fruit trees or berry bushes and use a nearby compost bin as a cozy bed."
To minimize odors and discourage pests, position your compost bin at least 10 to 20 feet from your house. Steer clear of placing it near fruit trees, berry bushes, or chicken coops, as these already attract wildlife. A little distance can make a significant difference.
When choosing a spot, go for an open, level area with good airflow. Avoid placing the bin against walls or fences, as these structures can act as sheltered runways for rodents looking to sneak into your compost. Keep the area around the bin clear by trimming overgrown grass and removing debris, as these can serve as hiding spots or nesting areas for pests.
It’s worth noting that bears can smell poorly managed compost from over a mile away, and even tiny gaps can be enough for mice to slip in. To prevent your compost from becoming part of an all-you-can-eat buffet, regularly pick up fallen fruit and clean up spilled birdseed. By eliminating these additional food sources, you’ll make your compost far less tempting to scavengers.
6. Control Moisture Levels
Keeping moisture in check is another key step in reducing pest problems in your compost. The goal is to maintain a dampness similar to a wrung-out sponge - when squeezed, it should release just one or two drops of water. This simple "Squeeze Test" is an easy way to monitor moisture levels, and it’s a good idea to check at least once a week.
For effective decomposition, moisture levels should stay between 40% and 65%. If the pile gets too dry, it can become a cozy nesting spot for ants. On the other hand, too much moisture leads to anaerobic conditions, which can cause unpleasant odors and attract pests like flies, roaches, and wasps.
Amanda Shiffler highlights this issue, saying:
"High moisture levels will create odors and attract pests, especially insects like flies. This happens because excess water in your compost creates anaerobic conditions with little oxygen available."
To avoid these problems, it's important to adjust moisture levels quickly. If the pile is too wet, give it a good turn and mix in dry brown materials like shredded cardboard, dry leaves, or straw. If it’s too dry and decomposition has slowed down, gradually add water while mixing, or toss in fresh grass clippings to increase moisture.
Rainy weather can also be a challenge, so take precautions by covering your pile with a tarp or using a secure lid to prevent waterlogging. A well-balanced compost pile should smell earthy - not sour or sulfur-like - which makes it far less appealing to pests.
sbb-itb-0bbb908
7. Secure Indoor Compost Containers
Indoor composting comes with its own set of challenges, especially when it comes to keeping pests out. To start, make sure your kitchen compost bin has a tight-fitting or locking lid. Even tiny gaps - just 1/4 inch wide - can let mice in, and rats only need 1/2 inch to squeeze through. This simple step works hand-in-hand with outdoor pest prevention strategies.
When selecting a bin, stainless steel is a better option than plastic. It resists odors, is easier to clean, and won’t tempt rodents to chew through it. Many high-quality bins also include activated charcoal filters in the lid to help neutralize odors. Keep in mind, though, that these filters need to be replaced every 3 to 6 months to stay effective.
Proper airflow is key to preventing bad smells. Bins with perforated lids allow air circulation, reducing the chance of anaerobic odors. To keep insects out, line the ventilation holes with 1/4-inch hardware cloth. As food writer Madeline Muzzi explains:
"Airflow reduces the smell of a compost bin. Tightly sealed lids create anaerobic conditions, which can lead to fermentation."
To maintain a clean and pest-free environment, empty your indoor bin at least once a week - or daily if it lacks a filter - and wash it thoroughly after each use to remove any residue that could attract pests.
For extra protection, consider bins with hinged lids that snap shut or mountable designs to keep them off your countertops. If pests are a persistent problem, you can store food scraps in a sealed container in the freezer until it’s time to add them to your compost bin.
8. Bury Food Scraps Deep
Keeping pests away from your compost starts with how you handle food scraps. Leaving them exposed on the surface is like rolling out the red carpet for rodents, raccoons, and flies. The fix? Bury your kitchen scraps deep in the center of the pile, where they’re less likely to be detected or reached.
Here’s how: grab a garden fork, dig into the center of your compost pile, and drop the scraps in. Then, cover them with 6–12 inches of "brown" materials like dry leaves, straw, or shredded paper. This not only hides odors but also creates a barrier that pests can’t easily penetrate. As garden expert Amanda Shiffler puts it:
"Burying these materials in the pile makes it harder for pests like flies and mice to detect and access them."
For even better results, chop your scraps into smaller pieces - about 1–2 inches. Why? Smaller pieces break down faster, reducing the time they spend attracting unwanted critters. Also, placing scraps in the hot center of an active pile, where temperatures can hit 130–135°F, helps deter pests naturally.
If you’re working with a smaller setup, like a worm bin, try the corner rotation method. Each time you add food scraps, bury them in a different corner. This keeps the compost balanced and less appealing to pests.
9. Check and Repair Your Bin Regularly
Keeping pests at bay starts with a secure bin, but it doesn’t end there. Regular inspections are crucial for maintaining long-term protection. Rodents are crafty little opportunists - they’ll find and exploit even the tiniest vulnerabilities. That’s why a weekly check of your bin is so important.
Take a close look at your bin for any signs of wear or damage. Pay special attention to areas like ventilation holes and corners where the plastic might be thinner - chew marks here are a red flag. Check the lid to ensure it seals tightly, and look for any warping or gaps. If your bin has wire mesh or hardware cloth, examine it for rust, tears, or any openings that might have widened. Don’t skip the base - watch for signs of tunneling or disturbed soil, which could indicate an unwanted visitor. These routine inspections are a powerful way to reinforce your pest prevention efforts.
"Rats are able to chew through plastic bins, usually starting with the vents." – Cornell University
If you spot any damage, fix it right away. Use 1/4-inch, 18-22 gauge galvanized hardware cloth for repairs, and consider adding weatherstripping or securing the lid with a bungee cord or even a heavy concrete paver. For chewed ventilation holes, lining the inside with metal mesh is a smarter choice than patching the plastic - it’s far more durable.
If pests do manage to find their way in, take action immediately. Power wash the bin’s exterior to remove rodent urine and discourage them from returning. Staying on top of repairs and maintenance is a cornerstone of keeping your compost system pest-free.
10. Use Safe Pest Control When Needed
Even with the best preventive steps, pests can still find their way into your compost. When that happens, it’s important to tackle the problem with safe, targeted methods that won’t harm people, pets, or the helpful decomposers doing the hard work in your pile. Here are some effective and safe ways to handle common compost pests.
For crawling insects like ants and beetles, diatomaceous earth is a great natural option. This fine powder dehydrates pests with hard shells on contact but won’t harm soft-bodied creatures like earthworms. To protect your decomposers, sprinkle it around the bin's perimeter instead of directly on the pile.
Rodents can be discouraged with natural deterrents. Use cotton balls soaked in peppermint oil or sprinkle cayenne pepper or garlic powder around the bin to keep scavengers at bay.
If slugs are causing trouble, a simple spray made from one cup of ammonia diluted in one quart of water can eliminate them instantly without affecting the compost’s balance. For persistent rodent issues, mechanical traps are a better option than poisons. Just make sure the traps are placed in areas where children and pets can’t access them.
"The use of poisonous bait is never recommended because it can endanger the lives of pets and other wildlife. The use of glue traps is just plain cruel." – Jessica Bombar, Solana Center
When prevention and DIY solutions aren’t enough, consider using specialized pest control kits. These kits are designed with safety in mind, offering professional-grade products that are safe for both pets and children. Whether you’re dealing with insects or rodents, these tailored solutions focus on the pests causing trouble while keeping your household and compost ecosystem safe.
Comparison Table
Compost System Comparison: Pest Resistance, Cost, and Maintenance Requirements
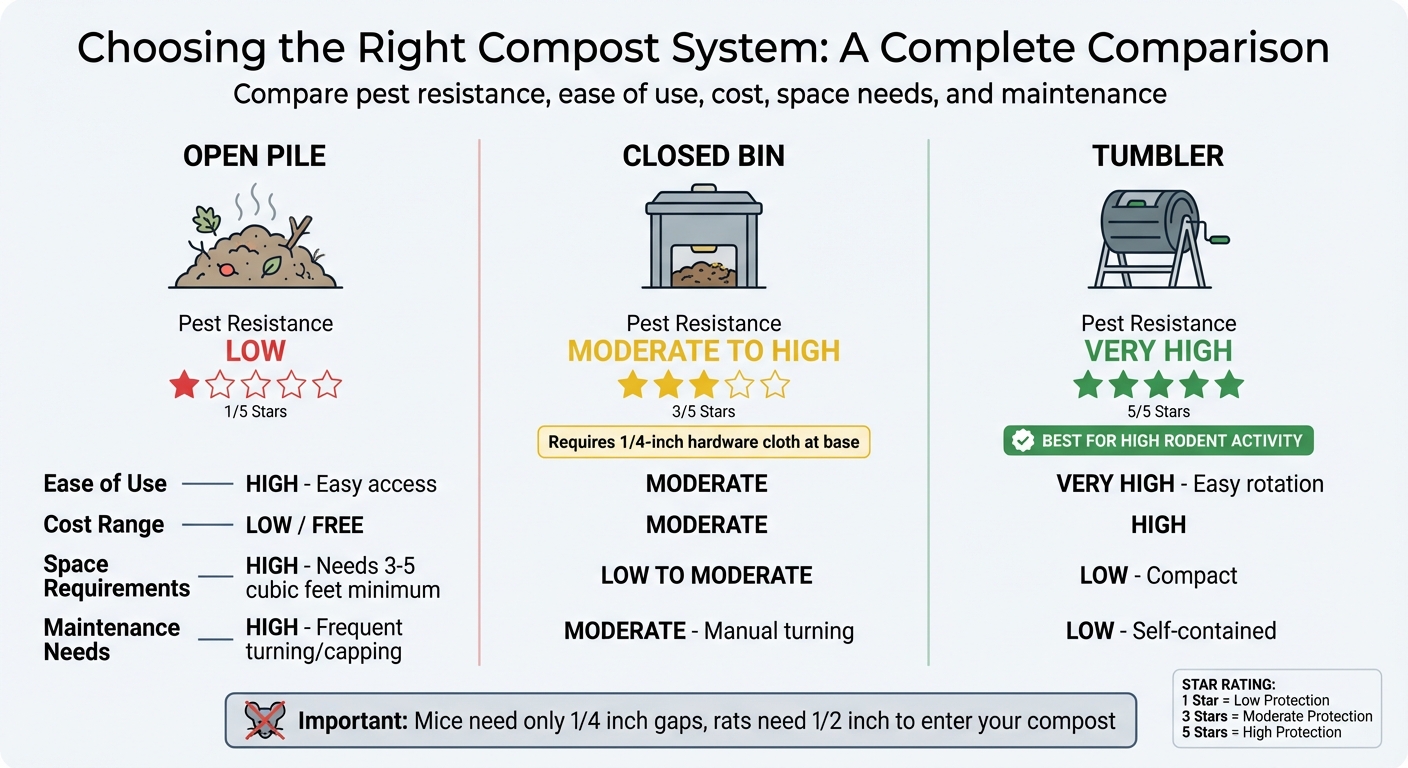
When it comes to keeping pests at bay and maintaining your compost, the type of system you choose makes a big difference. Open piles, while affordable and often free if you use recycled materials like pallets or scrap wood, provide little protection against pests. To improve pest resistance, you can cover food scraps with 6–12 inches of browns, but these piles still demand constant attention and regular turning.
Closed bins, constructed from durable metal or thick plastic with secure lids, offer better protection. However, adding a layer of 1/4-inch hardware cloth at the base is still necessary to keep out determined critters. These bins come at a moderate cost and require manual turning, making them a practical choice for most backyards.
For the best pest resistance, tumblers are the way to go. These fully enclosed, elevated systems are easy to rotate and need minimal upkeep. While they are more expensive, their compact size and low maintenance make them ideal for small yards or urban spaces.
| System Type | Pest Resistance | Ease of Use | Cost Range | Space Requirements | Maintenance Needs |
|---|---|---|---|---|---|
| Open Pile | Low | High (Easy access) | Low / Free | High (Needs 3–5 cubic feet minimum) | High (Frequent turning/capping) |
| Closed Bin | Moderate to High | Moderate | Moderate | Low to Moderate | Moderate (Manual turning) |
| Tumbler | Very High | Very High (Easy rotation) | High | Low (Compact) | Low (Self-contained) |
This table can help you decide which system aligns best with your pest control needs. Keep in mind, gaps as small as 1/4 inch can let mice in, and rats only need 1/2 inch. If you're dealing with a lot of rodent activity, a fully enclosed tumbler might be your best bet. Jessica Bombar from the Solana Center emphasizes:
"For composting projects in areas where rodent activity is high - the use of fully enclosed bin systems may be your best option".
Conclusion
Keeping your compost free of pests comes down to a few straightforward habits. Simple steps like maintaining proper layering and controlling moisture levels can reduce odors and make your compost less attractive to pests. Regularly turning the pile disrupts nesting sites, while keeping moisture levels around 60%–65% - similar to the feel of a wrung-out sponge - helps prevent issues like fly infestations and anaerobic decay.
Physical barriers also play a key role. Using a secure, enclosed bin and placing it strategically in your yard can make your compost harder for pests to find.
Temperature management is another critical factor. Maintaining your compost pile at 130–135°F not only speeds up decomposition but also kills weed seeds and deters pests. As one expert puts it:
"If you treat them right, microscopic soil organisms will turn kitchen and garden debris into 'black gold'".
By following these practices, you’re not just keeping pests away - you’re creating a cleaner, easier-to-maintain compost pile that’s safer for your garden and home. A pest-free compost system prevents the spread of harmful pathogens and parasites that rodents might carry, while also helping you divert waste from landfills and nurture a thriving backyard ecosystem. Every time you add kitchen scraps or turn your pile, you're taking a small but meaningful step toward a healthier garden.
If pests remain a problem, targeted pest control can provide an extra layer of protection without harming your compost. For hassle-free solutions, our Remedy customized pest control kits offer safe, pet- and child-friendly options, complete with clear instructions and virtual support to keep both your compost and home secure.
FAQs
How can I stop my compost pile from smelling bad?
To keep your compost pile smelling fresh, the key is maintaining a good balance and giving it proper attention. The ideal mix is about 1 part green material (like kitchen scraps or fresh grass clippings) to 3 parts brown material (such as dry leaves, straw, or shredded newspaper). This ratio ensures the pile stays manageable and odor-free.
Here are some helpful tips to keep things on track:
- Layer it up: After adding food scraps, sprinkle a layer of dry brown material on top. This absorbs excess moisture and helps control smells.
- Check the moisture: Your compost should feel like a damp sponge - add water if it’s too dry or mix in more brown materials if it’s too wet.
- Turn it regularly: Aerate the pile every 1–2 weeks to keep air flowing and prevent smelly, oxygen-deprived spots.
- Avoid problem items: Skip adding meat, dairy, or oily foods, as they break down slowly and can attract unwanted pests.
If you’re still dealing with odors or critters, a customized pest-control kit from Remedy could be a game-changer. These kits are safe for both pets and kids and are designed to keep pests out of your compost area. With the right care, your compost will stay fresh, pest-free, and ready to transform waste into nutrient-rich soil for your garden!
What shouldn't I put in my compost pile to keep pests away?
To prevent pests from invading your compost, it's best to skip adding meat, fish, dairy, bones, greasy foods, or leftovers with heavy seasoning. These items tend to attract animals and insects you don’t want hanging around. Additionally, avoid tossing in pet waste, cat litter, diseased plants, or weed seeds, as they can bring harmful pathogens or lead to unwanted weeds when you use the compost later.
How can I keep my compost at the right temperature to prevent pests?
Maintaining the right temperature in your compost pile is essential for both effective decomposition and keeping pests at bay. The sweet spot lies between 130–135°F - this range is hot enough to kill weed seeds and pathogens but not so hot that it harms the beneficial bacteria doing the hard work. If the temperature dips below 100°F, microbial activity slows down, while anything above 150°F can be damaging to the good bacteria. A compost pile that’s at least ½ to 1 cubic yard in size is ideal for retaining heat.
To strike the perfect balance, combine greens (like kitchen scraps or fresh grass clippings) with browns (like dry leaves or shredded newspaper) in a 1:3 ratio by volume. Keep the pile’s moisture level similar to that of a wrung-out sponge, and cover it with a layer of dry browns to help trap heat and discourage flies. Regularly monitor the temperature using a compost thermometer and turn the pile every 1–2 weeks, especially if the temperature drops below 100°F or climbs above 150°F. Turning helps reintroduce oxygen and ensures the heat is evenly distributed.
If pests persist despite keeping the temperature in check, you might want to try Remedy DIY Pest Control kits. These kits are safe for pets and kids, simple to use, and designed to protect your garden while allowing your composting process to continue without disruption.