

When it comes to keeping pests out of your home, the two main options are foundation barriers and perimeter sprays. Here's a quick breakdown to help you decide:
- Foundation barriers target underground pests like termites. They involve applying long-lasting treatments deep into the soil around your home's base. These barriers can last 5–10 years for chemical options or over 30 years for physical ones. They’re ideal for termite-heavy areas or new construction but require professional installation and cost $500–$3,000.
- Perimeter sprays focus on surface-level pests like ants, spiders, and ticks. They’re applied to walls, doors, windows, and up to 6 feet into your yard. DIY sprays are affordable ($15–$50) and easy to apply but need reapplication every 1–3 months, especially in rainy or sunny climates.
Quick Tip: Use both methods together for a layered defense - foundation barriers for long-term protection and perimeter sprays for seasonal pests.
Quick Comparison
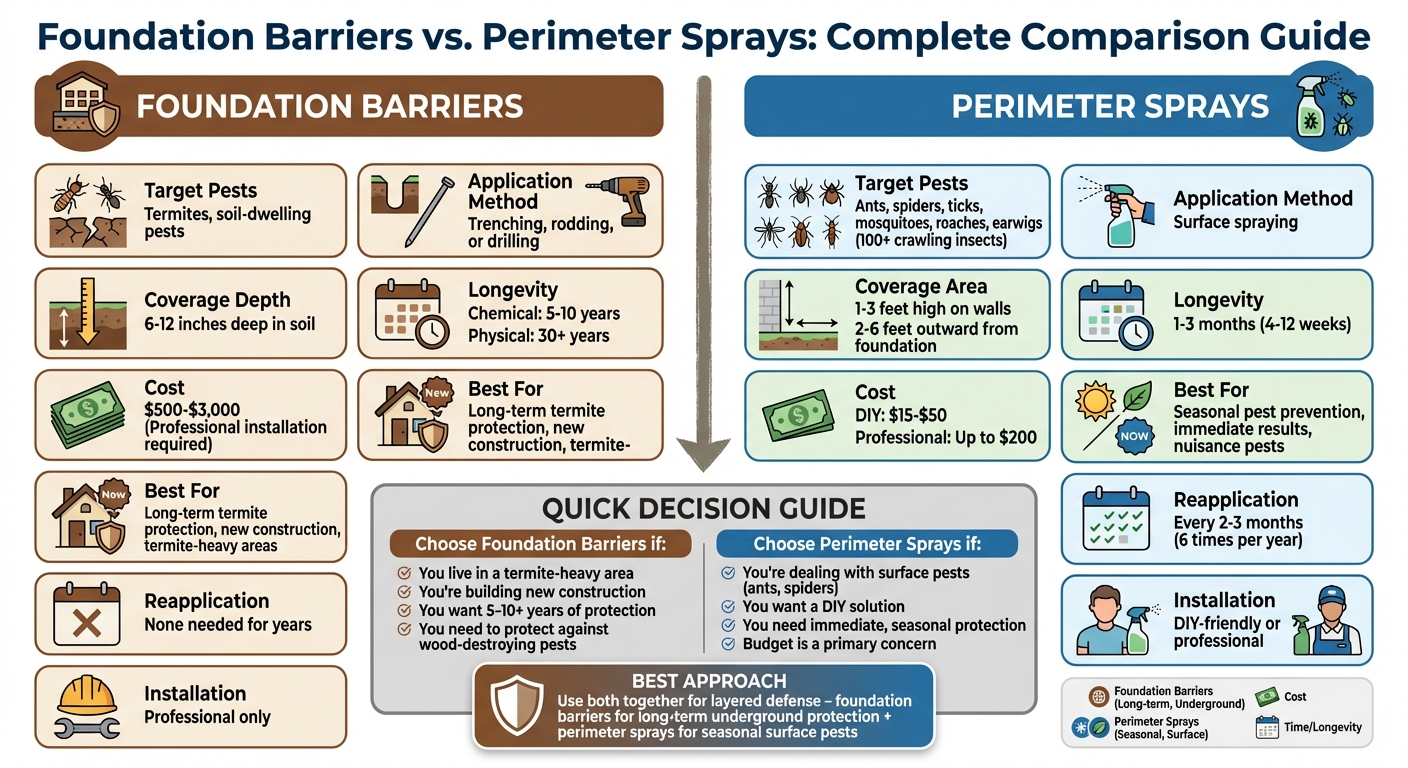
| Feature | Foundation Barriers | Perimeter Sprays |
|---|---|---|
| Target Pests | Termites, soil-dwelling pests | Ants, spiders, ticks, mosquitoes |
| Application | Trenching, rodding, or drilling | Surface spraying |
| Coverage | 6–12 inches deep in soil | 1–3 feet high, 2–6 feet out |
| Longevity | 5–10 years (chemical), 30+ years (physical) | 1–3 months |
| Cost | $500–$3,000 | $15–$50 (DIY), up to $200 (pro) |
| Best For | Long-term termite protection | Seasonal pest prevention |
Both options serve different purposes, so your choice depends on the pests you're dealing with and your budget.
Foundation Barriers vs Perimeter Sprays: Complete Comparison Guide
HOW TO APPLY PERIMETER PEST CONTROL / EASY DIY PERIMETER PEST CONTROL SOLUTION
sbb-itb-0bbb908
What Are Foundation Barriers?
Foundation barriers are protective systems installed along your home's foundation to stop subterranean termites and other soil-dwelling pests from gaining entry. Unlike perimeter sprays that treat surface areas, these barriers focus on underground pest activity. They can be chemical treatments, using non-repellent termiticides like fipronil to eliminate termite colonies, or physical barriers such as stainless steel mesh and graded sand to block pest access.
Chemical barriers create a treated zone where the foundation meets the soil. Non-repellent chemicals like fipronil are particularly effective because termites can't detect them. As termites move through the treated area, they pick up the toxin and transfer it to others in their colony, leading to its eventual collapse.
Physical barriers, on the other hand, act as a physical blockade. Materials like stainless steel mesh and graded sand form a long-lasting obstacle that termites cannot penetrate, often providing protection for over 30 years.
"Termite barrier systems should be the first line of defense." – Carrie Powers, Polyguard
One major distinction from perimeter sprays is the depth of application. Foundation barriers are installed down to the home's footer through methods like trenching and soil injection. This deep placement targets termites in their underground habitats, offering an especially effective defense against subterranean species. This proactive approach can save homeowners from repair costs, which average around $3,000.
How to Apply Foundation Barriers
Here’s a breakdown of how foundation barriers are installed:
- Trenching: Start by digging a trench about 6 to 7 inches deep around your home's perimeter. Fill this trench with a liquid termiticide at a rate of roughly 4 gallons per 10 linear feet. Once the soil absorbs the chemical, backfill the trench with the treated soil.
- Concrete Areas: For patios, driveways, or garages, technicians drill holes every 12 inches through the concrete slab to inject termiticide into the soil below.
- Rodding: If the foundation footer is deeper underground, a technique called "rodding" is used. A hollow rod is inserted into the soil, and termiticide is injected as the rod is pulled out, ensuring the chemical reaches the footer.
- Pipe Penetrations: Foam machines are used to expand termiticide around plumbing under slabs, sealing gaps where pests might enter.
It's crucial to ensure the barrier is continuous, as even a small gap could allow termites through.
Main Features of Foundation Barriers
Foundation barriers offer long-lasting protection that outperforms most surface treatments. Chemical barriers typically last for 5 to 10 years, while physical barriers can remain effective for 30 years or more - often lasting as long as the building itself.
What sets foundation barriers apart is their ability to penetrate deep into the soil, targeting termites where they live and travel. This proactive approach stops pests before they can reach your home.
In addition to keeping out termites, these barriers can also deter other crawling pests like ants, spiders, and earwigs that might enter through foundation cracks. Because the barrier works continuously, there’s no need for seasonal reapplications.
Professional installation costs typically range from $500 to $2,000, making it a smart investment for long-term protection. With their deep reach and durability, foundation barriers are a key part of any comprehensive DIY pest control plan.
What Are Perimeter Sprays?
Perimeter sprays are liquid insecticides applied to the outside of your home to form a chemical barrier that keeps pests from getting inside. Unlike foundation barriers, which target pests below ground, perimeter sprays work on the surface. The treated zone is typically about 6 feet wide, covering 1 to 3 feet up the exterior wall and extending 2 to 6 feet out from the foundation. This application also includes critical areas like door frames, window sills, vents, and utility openings [2, 5, 16].
Most perimeter sprays use residual insecticides, often synthetic pyrethroids, which stick to surfaces. When pests come into contact with the barrier, they absorb the chemical through their legs and exoskeletons, leading to their eventual death [16, 5].
"Instead of reacting to infestations after they've started, you're preventing them from happening in the first place." – Cory Overman, Owner, Shades of Green Lawn Care
Once applied, the spray dries in 1 to 2 hours and remains effective for weeks or even months. Professional treatments generally last about 3 months, while DIY versions provide protection for 4 to 12 weeks, depending on factors like weather and surface type [5, 6]. To maintain consistent protection, it's recommended to reapply perimeter sprays about 6 times a year. Start in early spring when temperatures hit 50°F and pests become active, and continue treatments through late summer or early fall to keep overwintering pests at bay [5, 6].
How to Apply Perimeter Sprays
Applying perimeter sprays is simpler than installing foundation barriers, but the right approach is essential for effectiveness. Begin by preparing the area - trim vegetation and clear debris near the foundation to ensure the spray can reach all surfaces. Focus on key areas like the foundation, door thresholds, window frames, vents, utility openings, and the edges of landscape beds [17, 5].
Timing matters, too. Apply the spray in mild, dry weather, and avoid application if rain is expected within 24 hours. Heavy rain can wash away the spray before it has a chance to adhere properly [17, 21]. By following these steps, you can create a reliable barrier that keeps pests out.
Main Features of Perimeter Sprays
Perimeter sprays offer fast, long-lasting protection when applied correctly. One of their biggest advantages is how quickly they can be used - treating the exterior of an entire home can take less than an hour, which is much faster than more labor-intensive methods like foundation barriers.
These sprays are effective against a wide range of crawling insects, including ants, spiders (like black widows and hobos), earwigs, millipedes, centipedes, crickets, beetles, and seasonal pests such as boxelder bugs, stink bugs, and Asian lady beetles [2, 5, 6, 19]. They can even impact flying pests like mosquitoes, wasps, and flies if those insects rest on treated surfaces [5, 6].
Another key benefit is their residual action. Once dried, the spray continues to kill pests for weeks or even months without needing frequent reapplication. DIY sprays typically last 4 to 12 weeks, while professional treatments can remain effective for up to 90 days [2, 5, 6]. Plus, DIY options are budget-friendly, with kits ranging from $15 to $50 depending on the brand and quantity.
That said, perimeter sprays have their limits. They work best as a preventative measure and are less effective for active infestations of wood-destroying pests like termites or carpenter ants, which require specialized treatments. Additionally, factors like heavy rain, intense sunlight, and high temperatures can reduce their effectiveness by washing away or breaking down the chemicals [5, 17].
Main Differences Between Foundation Barriers and Perimeter Sprays
The main difference between these two pest control methods lies in how and where they operate. Foundation barriers involve creating a continuous chemical barrier in the soil through techniques like trenching, rodding, or concrete drilling. This targets pests in the underlying soil before they can reach your home’s structure. On the other hand, perimeter sprays form a liquid band on surfaces such as walls, door frames, windows, and the ground surrounding your home. These sprays act as a surface-level defense, intercepting pests on contact.
The distinction also comes down to depth versus coverage area. Foundation barriers penetrate 6 to 12 inches into the soil at the footer, effectively stopping pests underground. In contrast, perimeter sprays cover a surface band that’s 12 inches to 3 feet wide and up to 3 feet high, targeting pests on exterior surfaces.
Another key difference is longevity. Foundation barriers provide long-term protection, lasting between 5 to 10 years when professionally applied. Perimeter sprays, however, need frequent reapplication - every 1 to 3 months - to maintain effectiveness. In areas with high UV exposure, like California, perimeter sprays may only last about 3 months.
"Perimeter sprays are one of the simplest and most effective tools you can use, if done correctly." – Ngan Nguyen Rawlings, Ph.D., Sr. Specialist, ScottsMiracle-Gro
The tools required also set these methods apart. Foundation barriers demand heavy-duty equipment like hollow rods, concrete drills, or foam machines, making them more suited for professional installation. In contrast, perimeter sprays can be applied with a standard manual or battery-powered sprayer, making them a more accessible option for DIY homeowners.
Comparison Table
| Factor | Foundation Barriers | Perimeter Sprays |
|---|---|---|
| Application Method | Trenching, rodding, or drilling | Surface band spraying |
| Target Areas | Soil around the foundation, under slabs, and pipe penetrations | Walls, doors, windows, vents, and thresholds |
| Coverage Width/Depth | 6–12 inches deep into the soil | 12 inches to 3 feet outward |
| Active Ingredients | Termiticides (e.g., fipronil, imidacloprid) | Residual insecticides (e.g., bifenthrin, cyhalothrin) |
| Reapplication Frequency | Up to 5–10 years | Every 1–3 months |
| Primary Pest Target | Termites and wood-destroying insects | Ants, spiders, roaches, earwigs, and ticks |
| Invasiveness | High (requires digging or drilling) | Low (surface application) |
Each method serves a specific purpose, so the choice depends on your pest problem and how much effort you’re willing to invest.
Pros and Cons of Foundation Barriers
Foundation barriers offer a durable solution for termite protection, with chemical treatments lasting 5–10 years and physical barriers potentially offering protection for the lifetime of the building. This durability reduces the need for frequent reapplications, unlike surface treatments that often require maintenance every few months. These barriers create a zone that either kills or repels termites, preventing them from reaching the structure.
"Investing in termite barrier systems can save homeowners significant amounts in repair costs. Termite damage often goes unnoticed until it is severe, which leads to costly repairs." – Carrie Powers, Polyguard
However, foundation barriers are not without their challenges. Installation costs can be steep, ranging from $1,500 to $3,500. The process itself is labor-intensive, involving tasks like trenching around the foundation or drilling through concrete slabs, particularly when retrofitting an existing home. Physical barriers are especially challenging to retrofit, making them more practical for new construction.
Chemical barriers, while effective, come with environmental concerns due to the large quantities of termiticides used. Although modern formulations are designed to be safe once dried, their effectiveness can weaken over time due to factors like soil conditions, heavy rainfall, and UV exposure.
Comparison Table
| Pros | Cons |
|---|---|
| Long-lasting protection (5–10 years for chemical treatments; lifetime for physical barriers) | High installation costs ($1,500–$3,500) |
| Requires minimal maintenance | Labor-intensive installation involving trenching or drilling |
| Prevents costly structural damage, with average repair costs around $3,000 | Difficult to retrofit into existing homes |
| Physical barriers are permanent and non-toxic | Environmental concerns with chemical barriers |
| Can boost property resale value | Needs professional installation for proper effectiveness |
Pros and Cons of Perimeter Sprays
Perimeter sprays are a straightforward and budget-friendly option for pest control, with DIY kits priced between DIY kits priced between $15 and $505 and $50. Acting as a proactive barrier, they help prevent pests like ants, spiders, cockroaches, and over 100 types of crawling insects from entering your home. Since these sprays are applied to exterior surfaces only, they eliminate the need to bring harsh chemicals into your indoor spaces.
The active ingredients, typically synthetic pyrethroids, stick to surfaces and remain effective for 4 to 12 weeks. Professional applications often provide thorough coverage, extending the treatment 3 feet up walls and 6 feet into nearby landscaping.
"An insecticide perimeter treatment serves as a first line of defense around your home, stopping pests before they enter." – Bioadvanced Science-Based Solutions
While these sprays offer a range of benefits, they also come with some drawbacks. Weather conditions are one of the biggest challenges - rain and UV exposure can quickly degrade the chemicals, reducing their effectiveness. In sunny states like California, the protective barrier typically lasts no more than three months, requiring reapplication every two to three months. Additionally, certain pests, like spiders, may evade the barrier since they don't absorb enough toxin through minimal contact. The sprays are also toxic while wet, taking one to three hours to dry, during which treated areas should be avoided. Porous surfaces, such as brick, tend to absorb more of the product, which can shorten the lifespan of the barrier.
Here’s a breakdown of the primary advantages and disadvantages of perimeter sprays:
Comparison Table
| Pros | Cons |
|---|---|
| Simple and quick DIY application | Requires frequent reapplication (every 2–3 months) |
| Effective against 100+ crawling insects | Only protects surfaces without trapping pests |
| Keeps chemicals outside your home | Weather (rain, UV, wind) reduces effectiveness |
| Residual effect lasts several weeks | Toxic to kids and pets until fully dry |
| Affordable DIY kits ($15–$50) | Porous surfaces shorten barrier durability |
| Dries odorless and safe after setting |
Weighing these pros and cons can help you determine whether perimeter sprays are the right choice for your pest control needs. You can also check your zip code to see which customized treatments are available for your specific area.
When to Use Foundation Barriers vs. Perimeter Sprays
Deciding between foundation barriers and perimeter sprays depends on the type of pest you're dealing with and the level of threat they pose. Foundation barriers are best suited for termite protection, particularly in areas with high termite activity. They're most effective during new construction - especially before the concrete slab is poured - when the soil beneath the structure can be directly treated. Older homes with weak points in their foundation, like cracks in slabs or gaps around utility pipes, also benefit from this thorough protection. These methods are designed for long-term security and are ideal for high-risk scenarios.
On the other hand, perimeter sprays are a go-to solution for tackling common nuisance pests. They work well for immediate results, particularly around specific entry points like door thresholds, window frames, and garage vents. If the pests originate from landscaping areas rather than the foundation itself, perimeter sprays are a more effective option.
"Full-coverage barriers provide a higher level of security needed in locations with heavy termite activity or for older buildings with many potential entry points." – Redi National
The longevity of these treatments is another key factor to consider. Professional soil barriers can protect homes for 5 to 10 years, while perimeter sprays require frequent reapplication, especially during high-pressure seasons like spring and summer. In sunny, UV-intense regions like California, the effectiveness of perimeter sprays may drop to just 2 to 3 months. For seasonal pest control - such as preventing stink bugs from entering during fall or stopping insects from breeding in early spring - perimeter sprays are often the more practical and cost-effective choice.
Cost also plays a significant role. DIY perimeter spray kits are relatively affordable, ranging from $15 to $50. In contrast, professional foundation barriers are a bigger investment, typically costing between $500 and $3,000 depending on the termite species and property size. For homeowners dealing with everyday pests, perimeter sprays offer a straightforward, budget-friendly solution. However, in termite-heavy areas or for new construction, foundation barriers provide years of protection and often include warranty benefits, making them a worthwhile investment.
Using Foundation Barriers and Perimeter Sprays Together
Pairing foundation barriers with perimeter sprays creates a layered defense to block pests at multiple entry points. The foundation barrier, typically a 12-inch to 2-foot band around the base of your home, acts as the first shield. The perimeter spray, extending 3 to 6 feet into your yard, adds an extra layer of protection.
"When it comes to keeping nuisance pests out of your home, creating a thorough, layered defense is essential. Perimeter sprays are one of the simplest and most effective tools you can use, if done correctly."
– Ngan Nguyen Rawlings, Ph.D., Sr. Specialist, ScottsMiracle-Gro
Before applying these treatments, clear vegetation at least 12–18 inches away from the foundation and remove any debris. For the foundation barrier, apply a continuous 12-inch liquid spray along the base of your home, paying close attention to areas like utility openings, dryer vents, and door thresholds. Extend the perimeter spray 3 to 6 feet into landscaping beds for broader coverage. You can also boost effectiveness by adding bait stations or granular treatments to the outer zone.
During application, safety is key. Keep children and pets indoors and allow the product to dry for 45 minutes to 3 hours before re-entering the treated area. Remove any pet toys, food bowls, and water dishes beforehand, and wipe your pet's paws with a damp cloth after they've been outside in treated zones. Store leftover products in their original containers and keep them out of reach.
To make this process simpler, Remedy offers customized kits with professional-grade products that are safe for pets and children. These kits come with clear instructions tailored to your home and pest challenges. Plus, regular shipments ensure you can reapply every 2–3 months during peak pest seasons, keeping your home protected year-round.
Conclusion
Foundation barriers create a protective 12-inch band around your home's base, sealing off entry points like cracks, vents, and thresholds. Meanwhile, perimeter sprays extend 3–6 feet into your yard, acting as a first line of defense to stop pests before they even reach your walls.
For DIY homeowners, combining these two methods during peak pest seasons - spring and fall - provides the best results. Treatments should be reapplied every 2–3 months, as their effectiveness typically diminishes after about 3 months due to UV exposure and weather conditions. Be sure to apply on dry, calm days, and allow 45 minutes to 3 hours before letting kids or pets back into the treated areas.
The type of surface you treat also plays a big role in how well and how long the treatment works. Smooth surfaces, like concrete or vinyl, hold treatments longer than porous ones, such as brick or wood. For pests like spiders and ticks that need direct contact, sprays work best. On the other hand, foundation barriers with residual agents like Bifenthrin are ideal for long-term control of ants and roaches.
To make pest control even easier, we offer customized kits with professional-grade products that are safe for pets and children. Each kit comes with clear, step-by-step instructions, regular shipments, and virtual support to identify pests, so you can stay protected without the hassle of guessing what to do next.
FAQs
Do I need a foundation barrier if I don’t see termites?
Adding a foundation barrier isn’t always required, but it can be a smart way to guard against future termite infestations - especially in regions where termites are common. Even if you haven’t spotted any signs of termites, this step acts as a preventative measure to help protect your home in the long run.
How do weather and surface type change how long perimeter sprays last?
Outdoor conditions such as rain, humidity, and sunlight can reduce how long perimeter sprays remain effective, typically lasting anywhere from 1 to 4 weeks. The type of surface they’re applied to plays a role too - porous or textured surfaces tend to absorb and break down sprays faster compared to smooth, non-porous ones. However, in dry and shaded areas, sprays may stay effective for several weeks or even months.
Can I apply both treatments myself, or should I hire a pro?
When it comes to foundation barriers and perimeter sprays, you can tackle these tasks yourself, but safety is key. Always wear protective gear and carefully follow the product instructions. Keep in mind that these treatments often need to be reapplied regularly to stay effective.
On the other hand, professional treatments tend to use more potent products and require specific expertise. They often deliver results that last longer. If you're uncertain about handling stronger chemicals or want guaranteed safety and efficiency, hiring a professional might be the better option.