

Applying pesticides the wrong way can harm your health, waste money, and damage plants. Missteps like overuse, spraying in windy weather, or treating the wrong spots are easy to avoid with the right approach. Here’s a quick guide to safe and effective pesticide use:
- Read the label carefully. It’s legally required and gives critical instructions on dosage, safety gear, and timing.
- Prepare properly. Use the right tools, protective equipment, and mix pesticides correctly to avoid spills or over-application.
- Check the weather. Avoid spraying on windy days, during rain, or in extreme heat to prevent drift and runoff.
- Target the right areas. Apply only where needed, and follow label instructions to protect non-target surfaces and organisms.
- Follow safety precautions. Wear protective gear, keep kids and pets away, and respect re-entry intervals after application.
Mixing Pesticides SAFELY | Do’s & Don’ts Every Homeowner Should Know
Preparing for Pesticide Application
Before applying pesticides, it's essential to gather all necessary information, equipment, and assess the conditions. Skipping these steps could lead to errors and unnecessary exposure. Here's a breakdown of what you need to do to ensure a safe and effective application.
Read the Product Label Carefully
The pesticide label is more than a guideline - it's a legal requirement. As the EPA clearly states on every registered product: "It is a violation of federal law to use this product in any manner inconsistent with its labeling". The label provides crucial details, such as which pests the product targets, where it can be applied, how much to use, and the safety measures required.
Pay attention to the label's signal word: DANGER/POISON indicates high toxicity, WARNING means moderate toxicity, and CAUTION signals low toxicity.
Next, review the Personal Protective Equipment (PPE) section. This section is non-negotiable. As Clemson University notes: "You must wear any personal protective equipment stated on the label; it is not just a suggestion!". The label specifies exactly what gear is needed - like gloves, goggles, respirators, or protective clothing.
Timing restrictions are also critical. The Restricted Entry Interval (REI) tells you how long people and pets must stay out of treated areas, while the Pre-Harvest Interval specifies how many days to wait before harvesting treated crops. Reviewing these instructions at every stage helps avoid costly or dangerous mistakes.
Get Your Tools and Safety Equipment Ready
Having your tools and safety gear prepared in advance reduces interruptions and minimizes the risk of contamination or exposure. Basic PPE should include chemical-resistant gloves (nitrile or rubber), safety glasses or goggles, a wide-brimmed plastic hat, and long-sleeved clothing to cover your arms and legs.
When mixing pesticides, use dedicated tools made of plastic or metal - never kitchen utensils or glass, as they can break or become contaminated.
Select the right sprayer for the job:
- Handheld trigger sprayers for small, targeted areas.
- 1–2 gallon pressurized tanks for precision applications.
- 4-gallon backpack sprayers for larger areas.
- Hose-end sprayers for quick coverage of lawns, though they are less precise.
Before starting, inspect sprayers and nozzles for any damage to avoid leaks or uneven application. Opt for coarse droplet nozzles to reduce misting and prevent drift.
Keep emergency supplies on hand, including clean water, dish soap, and paper towels for quick cleanup. A spill response kit with absorbent materials (like kitty litter or sawdust), heavy-duty garbage bags, and a disposable broom is also a must. Clemson University highlights a common risk: "The hands are the most likely route of exposure. Pesticide contamination often happens when people remove their gloves to open a container, wipe away sweat, adjust their equipment, etc.".
Check Weather and Environmental Conditions
Weather conditions can make or break the safety and effectiveness of a pesticide application. Avoid applying pesticides on windy days (winds above 8 mph), when temperatures exceed 90°F, or when rain is in the forecast or the ground is already saturated. As Pesticide Stewardship explains: "The active ingredients in some pesticides can vaporize and drift onto non-target surfaces". Applying during cooler times, like early morning or evening, helps reduce this risk.
For gardens and lawns, ensure plants are not stressed from drought if the label advises caution. Be mindful of blooming flowers, as many labels prohibit application when bees are actively visiting to protect these essential pollinators.
Common Pesticide Application Mistakes and How to Avoid Them
Mistakes in pesticide application can waste time and money, harm plants, and even pose safety risks. Avoiding these errors leads to better outcomes and safer practices.
Mistake 1: Using Too Much or Mixing Incorrectly
More pesticide doesn't mean better results. In fact, "Twice the amount will NOT do twice the job", and over-application can harm plants, the environment, and even you. Many errors occur during the mixing process, often due to inaccurate measuring tools or skipping important steps.
Using proper measuring tools is critical. Kitchen utensils, for example, can lead to dosing errors because they vary in volume. And don’t confuse liquid and dry ounces - liquid ounces measure volume, while dry ounces measure weight. Using the wrong type of measuring tool can throw off your application rates.
Another common misstep is tapping down dry granules in volumetric tubes, which increases density and can lead to over-application. Reusing old measuring tools from previous years or different products is also risky, as formulations and particle sizes can change between batches.
Mixing pesticides in the wrong order can cause clumping or chemical reactions that reduce effectiveness - some mixtures even form a "cottage cheese" texture or slime. To avoid this, perform a jar test before large-scale mixing and follow the "WALES" order when combining products.
Don’t forget to shake liquid pesticide containers before measuring. This step ensures even distribution of active and inert ingredients. Also, maintain an air gap when filling your tank - keep the hose end above the water level to prevent back-siphoning, which could contaminate your water source.
For precision, use graduated syringes (marked in cc or ml) for small liquid amounts and electronic scales for dry formulations. Many modern pesticides are highly concentrated, so a scale that measures down to 0.1 gram is a worthwhile investment and is easily found online.
Mistake 2: Applying in Bad Weather
Even with the right preparation and protective gear, weather conditions can still undermine your efforts. Wind can cause spray drift, potentially harming beneficial insects, nearby plants, or water sources. Rain can wash pesticides away before they’re absorbed, reducing effectiveness and creating runoff that pollutes groundwater.
"If weather conditions (wind speed and direction, humidity, temperature, inversions) are not favorable, and there is concern about spray that might result in drift, wait until there is no longer that element of doubt."
– Erdal Ozkan, Professor and Extension State Specialist, The Ohio State University
Extreme temperatures can also impact effectiveness. High heat can cause some products to volatilize, while high humidity may prevent others from drying properly. Cold water can complicate mixing - pesticides and dry formulations take longer to dissolve in water below 42°F. For example, sprayable ammonium sulfate took 22 minutes to dissolve completely in 40°F water. When using cold water, allow three to five minutes for each tank-mix partner to dissolve before adding the next product.
Always check the weather forecast before starting. Avoid spraying on windy days, and be cautious of dead calm, which can signal a temperature inversion. During inversions, small droplets stay suspended and can drift over long distances. Use low-drift nozzles to produce coarser droplets in marginal conditions, and ensure the product has enough time to dry before any expected rainfall.
Mistake 3: Treating the Wrong Locations
Applying pesticides to the wrong areas wastes product and increases environmental risks. Always target the correct locations as specified on the product label. Some indoor products even include diagrams to guide application.
Avoid applying pesticides to hard, non-porous surfaces like sidewalks or driveways. These surfaces allow pesticides to wash into storm drains and waterways, causing environmental harm. Similarly, never clean application equipment where rinse water might flow into gutters or open water.
For effective pest control, ensure the pesticide reaches the part of the plant where the pest resides. Contact-type products need full surface coverage, while systemic pesticides are absorbed by the plant and don’t require thorough coverage.
Before starting, remove items such as toys, tools, clothing, and pet dishes from the area. Cover aquariums and ornamental fish ponds to protect aquatic life.
Maintain a consistent nozzle height and angle for uniform distribution. Keep nozzles as close to the target as possible to minimize drift. If working indoors, ensure good ventilation, and if applying outside, close nearby windows and doors.
Mistake 4: Skipping Safety Precautions
Skipping safety measures puts everyone at risk. A common mistake is neglecting proper ventilation or failing to remove children and pets from the area before application.
The risk of exposure is highest during mixing and loading, especially if gloves are removed. Always wear the required personal protective equipment (PPE) listed on the label before handling pesticides. Keep emergency supplies like clean water, dish soap, and paper towels nearby for quick cleanup. It’s also smart to have a spill response kit ready, including absorbent materials like kitty litter or sawdust, heavy-duty garbage bags, and a disposable broom.
Check the label for the Restricted Entry Interval (REI) - this tells you how long people and pets must stay out of the treated area. If you apply pesticides regularly, consider using separate sprayers for herbicides and insecticides. Even after rinsing, herbicide residues can linger and damage sensitive plants during future applications.
With these common mistakes in mind, the next step is to dive into the proper techniques for applying pesticides effectively and safely.
sbb-itb-0bbb908
How to Apply Pesticides Correctly
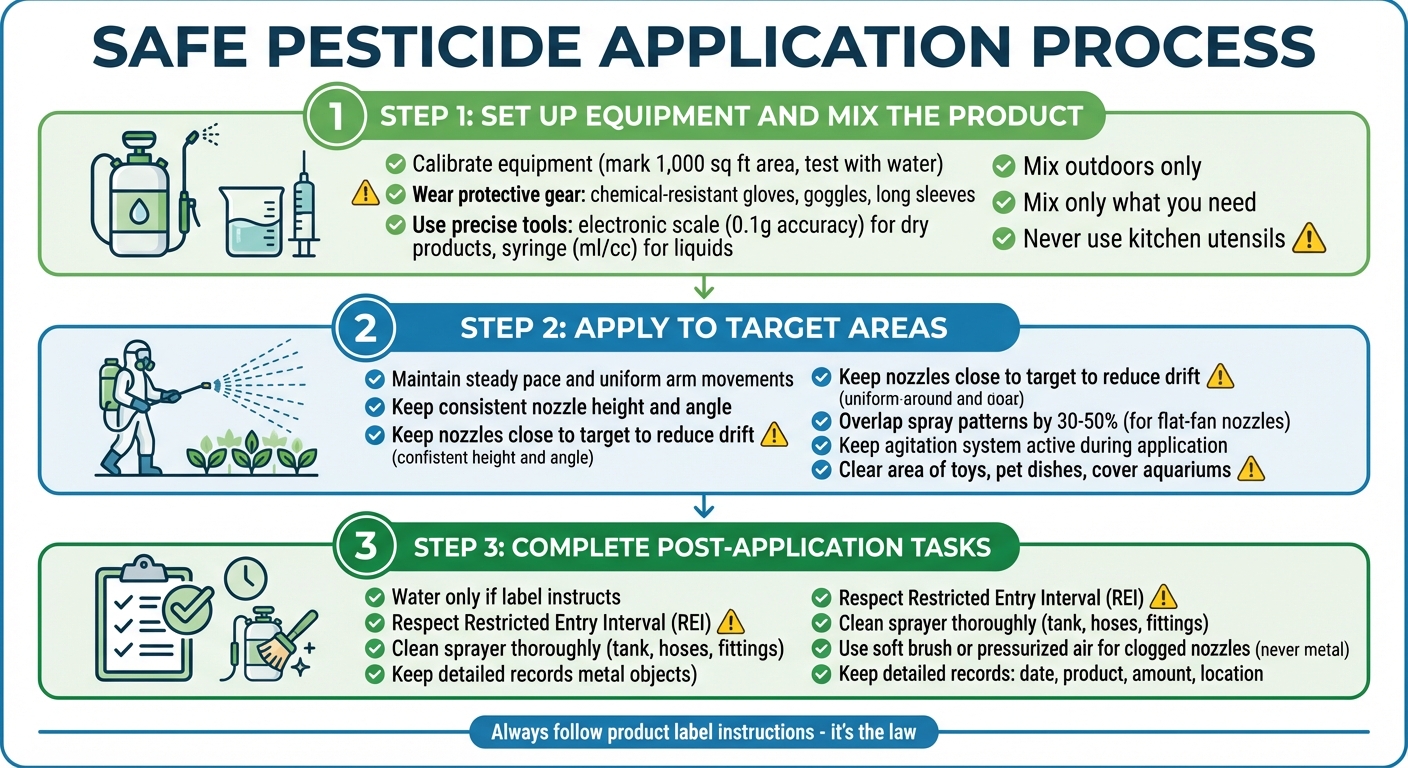
Safe Pesticide Application: 3-Step Process Guide
Now that you know what mistakes to avoid, let’s focus on how to apply pesticides the right way. These steps will help you use the correct amount, target the proper areas, and ensure safety for everyone involved.
Step 1: Set Up Equipment and Mix the Product
Start by calibrating your equipment. If the product label specifies an application rate per area - like pounds per 1,000 square feet - you’ll need to calibrate accordingly. Calibration is personal because factors like walking speed, arm motion, and nozzle height can alter how much product is applied.
To calibrate, mark off a 1,000-square-foot area and spray water at your usual pace. Time yourself, then spray into a bucket for the same duration to measure the volume delivered.
Mix the product outdoors while wearing proper protective gear - chemical-resistant gloves, goggles, and long-sleeved clothing are a must. Use precise tools for measuring: an electronic scale with 0.1-gram accuracy for dry products and a syringe marked in milliliters (ml) or cubic centimeters (cc) for small liquid amounts. Avoid household measuring spoons - they can vary significantly in volume. Keep a dedicated set of tools for pesticide use only, and never return them to the kitchen.
Mix only as much as you need to avoid waste. For liquid formulations, subtract the pesticide volume from the total water required to ensure the final solution is accurate.
Step 2: Apply to Target Areas
Once your equipment is calibrated and the product mixed, it’s time to focus on applying it precisely to the target areas.
Consistency is key. Maintain a steady pace, uniform arm movements, and consistent nozzle height and angle. These factors - sprayer pressure, walking speed, arm motion, and nozzle height - all need to stay steady for proper coverage.
Keep the nozzles close to the target area to reduce drift. If you’re using flat-fan nozzles for broadcast spraying, overlap spray patterns by 30% to 50% to ensure even coverage. Check your nozzles regularly; if they’re delivering more or less than 10% of the recommended output, it’s time to replace them.
Make sure the agitation system in your sprayer remains active during application. This prevents concentrated residues from settling in the tank. Before spraying, clear the area of toys, pet dishes, or other items, and cover aquariums or fish ponds to protect aquatic life.
Once you’ve finished applying the pesticide, there are a few crucial post-application tasks to handle.
Step 3: Complete Post-Application Tasks
This final step ensures safety and maximizes the effectiveness of your work.
Only water the treated area if the product label specifically instructs you to do so. Otherwise, irrigation could lead to runoff. Always follow the label’s directions carefully.
Respect the Restricted Entry Interval (REI), which specifies how long people and pets must stay out of the treated area. No one should re-enter until the time has passed or the spray has dried, as noted on the label.
Afterward, clean your sprayer thoroughly, including the tank, hoses, and fittings. If nozzles or screens are clogged, use a soft brush or pressurized air to clear them - never use metal objects like pins or knives, which can damage the nozzle and distort spray patterns.
Lastly, keep detailed records of every application. Include the date, product used, amount applied, and location treated. Not only does this help you track effectiveness, but it’s also often a legal requirement.
Cleanup and Monitoring After Application
Once you've finished applying pesticides, the job isn't over. Proper cleanup and ongoing monitoring are crucial to ensure safety and maintain effectiveness.
Clean Your Equipment and Dispose of Waste
Start by cleaning your sprayer and tools immediately to avoid issues like corrosion or unwanted chemical reactions. While still wearing your chemical-resistant gloves, wash them thoroughly to prevent any skin contact with pesticide residues.
Set up a designated cement cleaning area with a sump to capture contaminated wash water. During cleanup, wear protective gear such as rubber boots, an apron, goggles, and, if necessary, a respirator. For cleaning the equipment, mix 2 pounds of detergent with 40 gallons of water, circulate this solution through the system for 30 minutes, and then flush it through the booms and nozzles. If you've used phenoxy herbicides like 2,4-D, follow up with an ammonia rinse - mix 2 quarts of household ammonia with 25 gallons of water, leave it in the tank overnight, and then pump it through the nozzles the next day.
Properly dispose of pesticide containers by triple-rinsing them. Pour any leftover product into the spray tank, let the container drain for 30 seconds, then fill it one-quarter full with water, rinse, and pour the rinse water into the tank. Repeat this process three times. Once rinsed, punch holes in the containers and crush them to prevent reuse. Never dispose of leftover pesticides or rinse water in sinks, toilets, or drains. Instead, apply them to an area listed on the label.
Store Unused Products Safely
Always store unused pesticides in their original containers with clear labels. Keep them locked away and out of reach of children and pets. According to the U.S. Environmental Protection Agency, "state and local pesticide disposal laws may be stricter than the federal requirements on the label", so check your local regulations for guidance. Proper storage not only prevents accidental exposure but also helps protect the environment.
Never reuse empty pesticide containers - they may still contain residues that can contaminate anything new you store in them. If you have leftover product you can't use, consider sharing it with a neighbor who has a similar pest issue (as long as they follow the label instructions). Alternatively, contact local waste management authorities or call 1-800-CLEANUP to locate a Household Hazardous Waste collection program near you.
Track Results and Plan Next Steps
Once cleanup is done, it's time to monitor the results of your treatment. Keep an eye on the treated areas for signs of reduced pest activity or damage. Tools like insect pheromone traps can be helpful for tracking pest populations over time. Be patient - give the pesticide the time specified on the label to work before deciding if another application is necessary.
If the treatment doesn't seem effective, resist the urge to apply more pesticide. As Wayne Buhler, PhD, from Pesticide Stewardship, points out, "applying more pesticide than instructed by the label is illegal!". Instead, consider whether environmental factors like high winds (over 8 mph) or temperatures above 90°F might have caused issues like drift or vaporization. You may need to switch to a different product, try a non-chemical solution, or adopt an Integrated Pest Management approach.
Finally, keep detailed records of each application, including the product used, the location, and the date. These records can help you track long-term results, identify patterns, and ensure you're following safe and effective practices. Consistent monitoring and documentation are key to maintaining compliance and improving outcomes.
Conclusion
Applying pesticides correctly requires careful preparation, avoiding common pitfalls, accurate application, and proper cleanup. Always follow the label instructions - they're there to ensure safety and effectiveness. Misusing pesticides not only breaks the law but also creates unnecessary risks for your health, your family, and the environment.
The most important rule? Read the label. Check it before you buy, mix, apply, store, or dispose of the product. The label provides essential details, like which pests and areas the product is designed for, what protective gear you’ll need, and how to handle emergencies. And remember, using more than the recommended amount won’t improve results - it can actually be harmful.
To simplify the process, we offer custom pest control kits tailored to your specific needs and location. These kits include professional-grade products that are safe for pets and children, along with clear, easy-to-follow instructions. Plus, we provide virtual support for identifying pests and answering your questions. This step-by-step guidance ensures you can apply pesticides safely and effectively.
Effective pest control comes down to thoughtful planning, following instructions, and staying consistent. Keep detailed records of every treatment - the product used, the application area, and the date. This helps you track progress and demonstrates your commitment to safe and responsible practices. With our support, you can confidently manage pests while prioritizing safety and compliance.
FAQs
What safety steps should I follow when using pesticides?
To apply pesticides safely and effectively, the first step is to carefully read and follow the product label. The label includes essential instructions about proper use, required protective gear, and safety precautions.
Make sure to keep children, pets, and anyone not involved in the process away from the application area. Wear the recommended protective gear, which typically includes long sleeves, pants, gloves, goggles, and closed-toe shoes. Always handle and mix pesticides in a well-ventilated outdoor space, and avoid smoking, eating, or drinking while working with these products.
Select a calm day for application, ensuring the wind is mild and the temperature aligns with the guidelines on the label. Once you're done, wash your hands, face, and any exposed skin thoroughly. Properly store or dispose of any leftover product and empty containers according to the instructions provided. Following these steps helps keep your household, pets, and surroundings safe while effectively managing pests.
How can I make sure I'm using the right amount of pesticide?
To apply the right amount of pesticide, start by carefully reading the product label. It will tell you the recommended application rate and the water volume needed for your specific area. From there, calculate the exact amount required by adjusting the rate to match the size of your treatment area. For instance, if the label gives a rate per acre, convert your area into acres (remember, 1 acre equals 43,560 square feet) and use the corresponding proportion.
Make sure to use precise tools for measuring. A kitchen scale works well for dry products, while a graduated measuring container is ideal for liquids. Before you begin spraying, take the time to calibrate your sprayer. Test it with water first to confirm it delivers the correct output for your area. Once everything is set, mix the measured pesticide with the appropriate amount of water, stir it thoroughly, and double-check that your mixture matches the label’s instructions.
For those looking for an even easier solution, our Remedy DIY kits include professional-grade products that are safe for pets and children. Plus, they come with straightforward instructions tailored to your specific pest issue, helping you get it right every time.
What weather conditions should I avoid when using pesticides?
To apply pesticides effectively and safely, timing is everything. Skip windy days to prevent the product from drifting away from the target area. Avoid spraying during hot and dry weather, as high temperatures and low humidity can cause the pesticide to evaporate before it works. Also, steer clear of applying pesticides when rain is in the forecast, as rainfall can wash it away before it has a chance to do its job.