

Your garage could be a pest's dream home - but it doesn’t have to be. Pests like mice, cockroaches, and silverfish thrive in dark, cluttered, and poorly sealed spaces. They can cause damage, spread diseases, and create a mess. Here’s a simple breakdown to keep your garage pest-free:
- Seal entry points: Check for gaps around doors, windows, pipes, and walls. Use silicone caulk, steel wool, or weatherstripping to block even the smallest openings.
- Declutter and organize: Replace cardboard boxes with airtight plastic bins, store items off the floor, and avoid keeping food in the garage.
- Clean regularly: Sweep, vacuum, and remove spills or crumbs weekly. Keep trash in sealed bins and maintain proper ventilation to control moisture.
- Use repellents and traps: Natural options like peppermint oil or diatomaceous earth can deter pests, while traps help monitor activity.
- Inspect seasonally: Check for new cracks, droppings, or other signs of pests every three months.
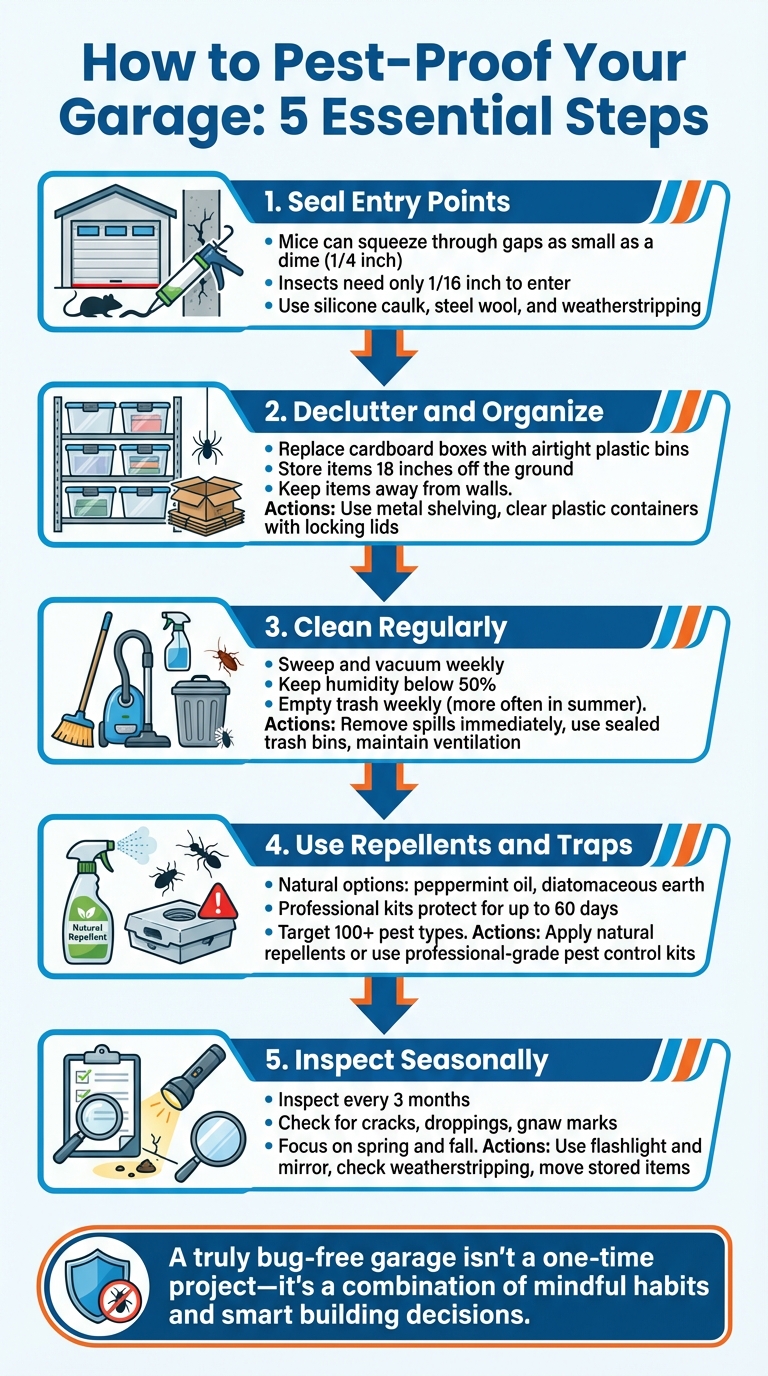
5-Step Process to Pest-Proof Your Garage
10 Effective Ways to Seal Your Garage Door and Keep Out Mice and Rats
How to Inspect Your Garage for Entry Points
A thorough inspection is your first line of defense against pests. Even the smallest gaps can become an open door. For instance, mice can squeeze through a hole as tiny as a dime, and insects or spiders can slip into cracks as narrow as 1/16 inch. These small imperfections can lead to big infestations.
Start by carefully inspecting your garage, both inside and out. The goal? Spot every potential entry point before pests do. As Michael F. Potter, Extension Entomologist at the University of Kentucky College of Agriculture, explains:
One of the best ways to limit unwanted intrusions by insects, rodents, birds, squirrels and other pests is to deny them entry - a procedure known as pest proofing.
This process doesn’t require any special expertise - just time, patience, and a methodical approach. Taking the time to inspect now can save you from expensive pest-related damage down the road and prepares you for sealing up those gaps and decluttering later.
Where to Look for Gaps and Cracks
The garage door perimeter is often the main entryway for pests. Close the door during daylight hours and check for any light sneaking in around the bottom or sides. If you see light, there’s a gap big enough for pests. Pay close attention to the weather stripping at the bottom and sides - look for signs of wear like cracking, peeling, or warping.
Next, examine your foundation and walls for small cracks in the concrete or gaps where the floor meets the walls. These can form over time due to weather or shifting foundations. Inspect utility penetrations, such as areas around pipes, electrical conduits, gas lines, dryer vents, and cable entries, for any openings. Don’t forget to check windows and side doors for loose frames, cracked glass, missing seals, or damaged screens. Finally, inspect the roofline and eaves for gaps under loose shingles or where the roof meets the walls of the garage.
Move storage boxes and equipment away from walls to uncover hidden cracks or signs of pest activity. Look for droppings, gnaw marks on cardboard or wood, and dark smudges (called "rub marks") along baseboards. These clues can help you pinpoint which entry points pests are actively using.
Tools You'll Need for Inspection
To do the job right, gather a few basic tools. A flashlight is essential for lighting up dark corners and crevices, while a small mirror helps you see into tight spaces, like under low shelves or behind heavy items. A measuring tape will help you gauge the size of gaps - remember, mice need only ¼ inch, and insects need just 1/16 inch to get in. Use your phone or a notepad to document the location and size of any gaps, so you can purchase the right materials for sealing them later.
Make it a habit to inspect your garage every three months, especially during spring and fall when temperature changes can cause materials like caulk and weather stripping to shrink or wear down. Regular checks let you catch new vulnerabilities early and address them before they become major pest entryways. Keep a record of your findings to ensure timely repairs and ongoing pest-proofing efforts.
How to Seal Cracks, Gaps, and Openings
Once you've identified all the cracks and gaps, start by cleaning the surfaces with a mild detergent to remove dirt, dust, and any old sealant. Let the area dry completely before moving on to sealing. It's important to choose the right sealing material for each type of gap or crack, as different areas require different approaches. By following these steps, you can ensure that no opening is left unprotected.
For small cracks around windows, door frames, and foundation walls, silicone caulk is a great option. It stays flexible even in extreme temperatures and resists cracking or shrinking over time.
When addressing holes around pipes or electrical wiring, use steel wool or copper mesh to fill the openings. Cover this with caulk or spray foam to create a barrier that rodents can’t chew through.
For garage door perimeters, apply rubber or vinyl weatherstripping to the sides and top of the door, and install a threshold seal at the bottom. If rodents are a recurring issue, consider adding stainless steel rodent shields to the base of the weatherstripping to stop pests from gnawing through.
Now, let’s dive into the best materials for each sealing job.
Materials That Work Best for Sealing
Silicone Caulk
Perfect for stationary gaps like window frames, door trim, and foundation cracks, silicone caulk is waterproof, mold-resistant, and flexible. Be sure to pick a product that works with the materials in your garage, whether they’re wood, concrete, metal, or vinyl.
Steel Wool or Copper Mesh
These materials are essential for keeping rodents out. Mice can squeeze through gaps as small as 1/4 inch (about the width of a pencil). By stuffing steel wool or copper mesh into these openings and sealing them, you can stop pests from getting inside.
Spray Foam
Spray foam is excellent for filling large, irregular gaps around conduits, vents, or wall cavities. It expands to block drafts and prevent pest entry. However, since rodents can sometimes chew through foam, it’s wise to combine it with steel wool for added protection .
Weatherstripping and Door Sweeps
These are essential for sealing the moving parts of your garage, such as the sides, top, and bottom of doors. Regular use and temperature changes can wear them out, so inspect them every six months and replace damaged sections. For reference, a 32.8-foot seal for the top and sides of a garage door typically costs about $17.97, while a 20-foot threshold seal strip ranges from $31.99 to $33.97.
Metal Mesh or Hardware Cloth
For larger openings like vents or attic eaves, metal mesh or hardware cloth is a good choice. It allows airflow while keeping out rodents, bats, and birds. This also helps prevent moisture buildup, which can attract pests.
Epoxy or Polyurethane
These heavy-duty sealants are ideal for repairing cracks in foundations and floors. They strengthen the concrete and stop further cracking or moisture from seeping in. For deep cracks, an epoxy injection kit can provide a long-term fix.
Sealing Materials Comparison
| Material | Best Use Case | Pests Blocked | Durability & Ease |
|---|---|---|---|
| Silicone Caulk | Windows, door frames, small cracks | Insects, spiders | Flexible, weatherproof; easy to apply |
| Steel Wool / Copper Mesh | Utility penetrations (pipes, wires) | Mice, rats | Durable and chew-proof |
| Spray Foam | Large crevices, wall gaps | Insects, small rodents | Expands to fill voids; simple to use |
| Weatherstripping / Sweeps | Moving door edges | Insects, rodents | Wears over time; needs regular replacement |
| Epoxy / Polyurethane | Foundation and floor cracks | Termites, ants, rodents | Long-lasting; prevents structural damage |
| Fine-Mesh Screens | Vents, airways, windows | Wasps, flies, mosquitoes | Durable; blocks pests while allowing airflow |
Organizing and Decluttering Your Garage
A cluttered garage isn’t just an eyesore - it’s the perfect hideout for pests like rodents, spiders, and insects. These critters thrive in messy spaces filled with hiding spots and nesting materials. Tackling this problem goes beyond mere tidying; it’s about removing the conditions that attract pests in the first place.
"The mess can mask issues and gives pests easy cover." - Ed Spicer, CEO, Pest Strategies
Start by completely emptying your garage. Clear the shelves, sweep out the corners, and remove items from the floor. This process helps uncover pest activity, like droppings, gnaw marks, or spider webs, that might otherwise go unnoticed. Once everything is out, sort your belongings into three categories: Keep, Donate, and Trash. If you haven’t used something in over a year, it’s probably time to let it go.
How to Declutter Your Garage
Ditch the cardboard boxes and switch to plastic bins. Cardboard is a magnet for pests - it’s not just a hiding spot but also a food source for roaches, moths, crickets, and silverfish. Rodents, in particular, love chewing through cardboard and using the scraps for nests. Replace these with clear, airtight plastic containers with locking lids. They’ll protect your items while making it easy to see what’s inside.
Raise your storage game by using metal shelving and keeping items at least 18 inches off the ground. This makes it harder for crawling pests to reach your belongings and gives you a clear view of the floor for inspections. For larger items like bikes or tools, install pegboards, wall hooks, or ceiling-mounted racks. Organizing your garage into zones - like keeping tools in one area and sports gear in another - reduces clutter and prevents forgotten piles from becoming pest-friendly hideouts.
Avoid storing paper, old clothes, or fabric in your garage. These materials are prime nesting supplies for mice, so it’s better to keep them inside your home. Also, keep storage bins slightly away from walls and corners to eliminate tight spaces where pests love to hide.
How to Store Trash and Food Properly
Don’t leave pet food or birdseed in their original packaging. Transfer these items into thick plastic or metal containers with secure lids. Better yet, try to avoid storing any food-related products in the garage altogether.
"Pet food isn't just a snack; it's an entire buffet. The high protein and fat content are extremely appealing, especially to mice and rats." - 1st Defense Pest Solutions
For trash, use heavy-duty plastic or metal cans with tight-fitting, gasketed lids. If possible, keep trash and recycling bins outside the garage. If they must stay inside, make sure trash bags are tightly sealed and rinse recyclables to remove sugary residues that attract ants and flies.
sbb-itb-0bbb908
Keeping Your Garage Clean and Well-Ventilated
Once you've sealed gaps and decluttered, maintaining cleanliness and proper ventilation becomes key to keeping your garage pest-free. Regular cleaning helps fend off pests, while controlling moisture creates an environment that's less inviting to critters like silverfish, termites, cockroaches, and mosquitoes.
"A clean garage is less attractive to pests." - Brentwood Pest Control
Cleaning Schedule and Tools
Start with a consistent cleaning routine. Weekly sweeping and vacuuming should cover the basics, especially in corners, behind storage bins, and other areas where dust and debris tend to gather. If you spill sugary liquids, clean them up immediately with a mild detergent to erase scents that attract pests. Trash and recycling bins should be emptied weekly - more frequently during summer months when odors can worsen.
For a deeper clean, plan for seasonal sessions in both spring and fall. These thorough cleanings not only disrupt potential nesting sites but also give you a chance to inspect for signs of pests. Use a shop vacuum with attachments to get into tight spaces where pests or their eggs might be hiding. A flashlight and mirror can help you check dark spots under appliances or behind shelves for droppings, gnaw marks, or nests.
| Task | Recommended Frequency | Purpose |
|---|---|---|
| Sweep and Vacuum Floors | Weekly | Removes food sources, sawdust, and debris |
| Empty Trash and Recycling | Weekly (more in summer) | Eliminates odors and food residue that attract pests |
| Inspect for Signs of Pests | Every 3 Months | Early detection of droppings, gnaw marks, or nests |
| Deep Clean and Declutter | Seasonally (Spring/Fall) | Disrupts nesting sites and allows for a thorough inspection |
In addition to regular cleaning, focus on controlling moisture and maintaining proper airflow to further discourage pests. A clean and well-ventilated garage is far less hospitable to unwanted visitors.
How to Improve Ventilation and Control Moisture
Pair your cleaning efforts with effective ventilation to keep pests at bay. Keeping humidity levels below 50% is crucial for preventing mold and deterring pests that thrive in damp environments. If your garage tends to be humid, a dehumidifier can help; for a space of 1,000 square feet, aim for a model that removes 30–40 pints of moisture daily. Exhaust or floor fans can also help maintain airflow and regulate temperature, and fine-mesh screens on windows and vents allow fresh air in while keeping insects out.
"Ventilation will make the garage comfortable for you but uncomfortable for bugs." - Alan Bernau Jr, Founder, Alan's Factory Outlet
Address any water issues promptly. Fix leaks in water heaters, pipes, or roofs to eliminate standing water, which is a magnet for mosquitoes and other pests. Make sure your garage floor slopes outward to prevent water from pooling, and keep gutters clean to direct runoff away from the foundation. If your garage is cold, consider using a desiccant dehumidifier, which performs better in low temperatures than standard refrigerant models.
Using Repellents and Traps
Once your garage is clean and well-ventilated, consider adding repellents and traps for an added layer of protection. Natural methods are great for deterring pests, while professional-grade solutions are ideal for tackling active infestations.
Natural Pest Repellents
Essential oils like peppermint, eucalyptus, and cedarwood are effective at keeping pests away due to their strong scents. These work best as preventative measures rather than solutions for existing infestations. To use them, mix the oils with water, alcohol, or witch hazel in a spray bottle and lightly mist around the perimeter of your garage and key entry points. For a more concentrated effect, soak cotton balls in the oils and place them near doors, windows, and other vulnerable areas.
Another natural option is diatomaceous earth (DE), a fine powder made from fossilized algae. It works by damaging the exoskeletons of pests like fleas, ticks, cockroaches, and spiders, causing them to dehydrate. Sprinkle a thin layer along the edges of your garage to create a barrier that crawling insects won’t cross. Additionally, a simple 50/50 mix of vinegar and water can disrupt ant pheromone trails and deter spiders from setting up shop near windows and door frames.
You can also use chalk or spices like cinnamon, paprika, and garlic to create deterrent lines that pests such as ants and slugs won’t cross. For an extra touch, consider placing potted plants like basil, mint, marigolds, or chrysanthemums on shelves or hanging them around your garage. These plants naturally repel flies, bees, and spiders while adding a bit of greenery to your space.
If natural methods don’t completely solve the issue, it might be time to consider professional-grade solutions.
Professional-Grade Pest Control Kits
For more serious infestations, professional-grade pest control kits offer a stronger, longer-lasting solution. These kits typically include concentrated pest control products, a rechargeable spray wand, and straightforward instructions. They create a residual barrier that not only eliminates pests but also keeps them away for up to 60 days.
"Pesticides for household insects are designed to be applied at low concentrations, usually less than 1%. These concentrations are high enough to be effective in killing small insects, but pose no threat to people or pets." - Orkin
Our kits are tailored to address specific garage pest issues and are safe for households with pets and children. They effectively target over 100 types of pests, including ants, spiders, and cockroaches. Each kit comes with easy-to-follow instructions and virtual support to help identify pests, so you can handle the problem without inviting professionals into your home.
When applying the spray, focus on areas like baseboards (inside and outside), window sills, and door frames . Make sure to keep pets and children away until the treated surfaces are completely dry - usually within 30 to 60 minutes, though waiting 1 to 2 hours is even safer . Always ensure your garage is well-ventilated during and after application to speed up drying and minimize exposure to fumes .
Monitoring and Insulating for Long-Term Protection
Keeping pests out of your garage isn’t a one-time task. It requires consistent monitoring and occasional upgrades to maintain a pest-free environment throughout the year.
Regular Monitoring and Inspections
Set aside time every three months to inspect your garage for signs of pests. Look for droppings, gnaw marks, nesting materials, or yellow stains that could indicate rodent activity.
"Conduct thorough interior and exterior inspections every spring and fall to identify potential entry points and areas that require repair." - Big Time Pest Control
Pay special attention to vulnerable areas like utility penetrations (where pipes and wires go through walls), vents, and the seams where the garage door meets the floor. Extreme weather - whether it’s heavy rain, intense heat, or strong storms - can weaken seals, shift foundations, or affect drainage. After such events, do a quick check to ensure everything is still secure.
Sticky traps or pest monitors can help you detect early activity, especially when placed in corners or along walls. Use tools like flashlights or mirrors to inspect dark or hard-to-reach areas. Moving stored items occasionally is another smart move, as pests often hide in undisturbed, dark corners. Don’t forget to check the condition of weatherstripping around doors and replace it as needed.
Once you’ve established a routine for monitoring, take the next step by reinforcing your garage with better insulation and structural improvements.
Adding Insulation and Making Structural Improvements
After sealing gaps and decluttering, focus on reinforcing your garage to make it less inviting for pests. Upgraded insulation can help maintain a stable temperature and keep pests at bay during extreme weather. However, remember that rodents can chew through standard insulation or use it for nesting, so it’s essential to take extra precautions.
Seal gaps around pipes and utility lines with steel wool or copper mesh before applying caulk or foam for a secure barrier. For cracks smaller than 1/4 inch in drywall or brick, silicone caulk works best. Openings between 1/4 and 3 inches are better filled with expandable spray foam. For foundation cracks, use epoxy or polyurethane caulk, as these materials remain flexible even if the structure shifts.
To keep insects out, install fine-mesh screens over windows and vents. These screens allow airflow while blocking pests. If you’re considering bigger upgrades, metal garage structures are a durable option. Steel panels, for instance, are termite- and carpenter-ant-resistant since they don’t contain cellulose. Finally, swap out cardboard boxes for airtight plastic or metal containers to remove potential food sources and nesting spots for pests.
Conclusion
Keeping pests out of your garage takes effort, but it’s absolutely doable with regular inspections and maintenance. Start by checking every possible entry point - remember, even a gap as small as a dime is enough for mice to squeeze through. Seal these openings using the right materials: silicone caulk works well for small cracks, while steel wool or copper mesh is ideal for spaces around pipes and wires. Together, these steps create a solid defense against unwanted critters.
Next, focus on removing anything that might attract pests. Swap out cardboard boxes for airtight storage bins, store items on metal shelving raised off the ground, and make sure pet food and birdseed are safely secured. Regular cleaning, like sweeping and vacuuming, helps eliminate food crumbs, and maintaining humidity levels below 50% can deter pests that thrive in damp conditions, such as silverfish and cockroaches.
"A truly bug-free garage isn't a one-time project - it's a combination of mindful habits and smart building decisions." - Worldwide Steel Buildings
To keep your garage pest-free, schedule quarterly monitoring and seasonal inspections to ensure your seals remain intact. If these basic steps aren’t enough, there are advanced solutions available. For example, you can use pest control kits designed with professional-grade, pet- and child-safe products tailored to your specific needs. With a proactive approach, you can enjoy a pest-free garage all year long.
FAQs
What are some natural ways to keep pests out of my garage?
Keeping pests out of your garage doesn’t have to be complicated. With a few natural remedies, you can create a safe, pest-free space. Here are some simple yet effective options:
- Essential oils: Scents like peppermint, citronella, and lavender are great for deterring pests such as ants, spiders, and mice. Just mix a few drops of your chosen oil with water in a spray bottle, and mist areas like doorways, corners, and other entry points.
- Powders and spices: Food-grade diatomaceous earth is excellent for getting rid of crawling insects. For ants and slugs, powdered cinnamon or garlic can work wonders when sprinkled near potential entryways.
- Strong scents for rodents: Mice can’t stand the smell of peppermint, cloves, or ammonia. Soak cotton balls in one of these scents and place them in hidden corners or areas where rodents might nest.
If you're looking for an all-in-one solution, check out our DIY pest control kits. They come with natural, professional-grade products and straightforward instructions to help keep your garage pest-free all year long.
How often should I check my garage for pest entry points?
Inspecting your garage for possible pest entry points once a year is a smart habit. These regular inspections can help you identify cracks, gaps, or other weak spots early - before pests find their way inside. If you've dealt with pest issues recently or live in an area where infestations are common, stepping up your checks to every six months might be a better approach.
What are the best materials to seal gaps and cracks in a garage to keep pests out?
To seal those pesky gaps and cracks in your garage, rubber or vinyl weather-stripping is a great go-to. These flexible materials form a snug seal around doors, keeping pests from squeezing through tiny openings.
For cracks in walls or around windows, silicone caulk or expanding foam can do wonders. Both are long-lasting, simple to apply, and add an extra layer of defense to keep your garage free from unwanted critters.