

Want to keep pests out of your kitchen? Proper food storage is your best defense. Pests like ants, moths, and beetles can invade even the cleanest spaces if food isn’t stored securely. Here’s how to safeguard your pantry:
- Use airtight containers: Glass jars, metal tins, and heavy-duty plastic containers are your best options. Avoid thin plastic bags or cardboard packaging.
- Store food off the floor: Keep shelves organized and maintain an 18-inch gap from walls to improve airflow and make inspections easier.
- Clean regularly: Wipe down surfaces, vacuum corners, and remove crumbs to eliminate food sources for pests.
- Inspect and label food: Check for signs of infestation and always label containers with purchase and expiration dates.
- Dispose of infested food properly: Seal contaminated items in a bag and discard them in an outdoor trash can.
Protect Your Food Storage From Insect Infestation!
sbb-itb-0bbb908
How Pests Find and Access Your Food
Pests have an uncanny ability to sniff out food, relying heavily on food odors and pheromones to guide them. Even the smallest crumbs or a simple flour spill can serve as a beacon, luring them into your home.
These invaders are also surprisingly resourceful when it comes to packaging. Thin materials, small folds, or tiny tears in bags and boxes are no match for their persistent chewing. The National Pesticide Information Center explains:
Larvae can chew through plastic bags and thin cardboard, so even unopened packages may become infested.
Pests thrive in warm, dry spaces and are particularly drawn to dark, unused corners. Adult moths and beetles, on the other hand, are often attracted to light sources like windows or lamps. Spotting them near these areas could be an early sign of a kitchen infestation. Now, let’s explore which foods are most likely to attract these uninvited guests.
Foods That Attract Pests Most
Some foods are practically irresistible to pantry pests. Grains and starches - such as flour, rice, pasta, cornmeal, oats, and breakfast cereals - are at the top of the list. These items provide the perfect environment for pests to breed, allowing them to produce multiple generations each year. Similarly, sweets and snacks like chocolate, candy, cookies, crackers, and dried fruits are equally enticing.
Proteins and oily foods, including nuts, peanuts, dried and cured meats, and powdered milk, are also prime targets. These items supply the fats and proteins essential for larvae to grow quickly. Even pet food and animal products - like dry dog or cat food, birdseed, rawhide treats, and fishmeal - are common infestation sites, especially when stored in less secure areas like garages. And don’t overlook spices and herbs - specific pests are drawn to items like paprika, dried peppers, and tea.
Under the right conditions, pantry pests can complete their life cycle in just four to five weeks. A single female can lay between 100 and 1,000 eggs during her lifetime, depending on the species. For example, red and confused flour beetles can lay 300 to 500 eggs on food or in cracks where food debris is present. Understanding which foods attract pests can help you identify potential trouble spots and take preventative steps with a DIY pest control kit.
Where Pests Find Food in Your Home
While the kitchen pantry is the most obvious target, pests are opportunistic and will infest any area with accessible food. Kitchens, cabinets, drawers, countertops, garages, and even dark spaces behind appliances are all fair game.
Surprisingly, ceilings and walls can also become hiding spots. Indianmeal moth larvae, for instance, often crawl away from their food source to pupate on high walls or at the junction of ceilings and shelves.
Signs of an infestation include live beetles, flying moths, or worm-like larvae; silk webbing or clumped grains; "pepper-like" frass (excrement) and shed skins; tiny pinholes in packaging; and a foul, rancid smell in contaminated products. Sydney Crawley, Assistant Professor and Extension Specialist at NC State University, emphasizes:
Pantry pests are most often found in, near, or around the kitchen. However, they can theoretically be found in any area of the home as long as there is a food source available.
Use Pest-Proof Storage Containers
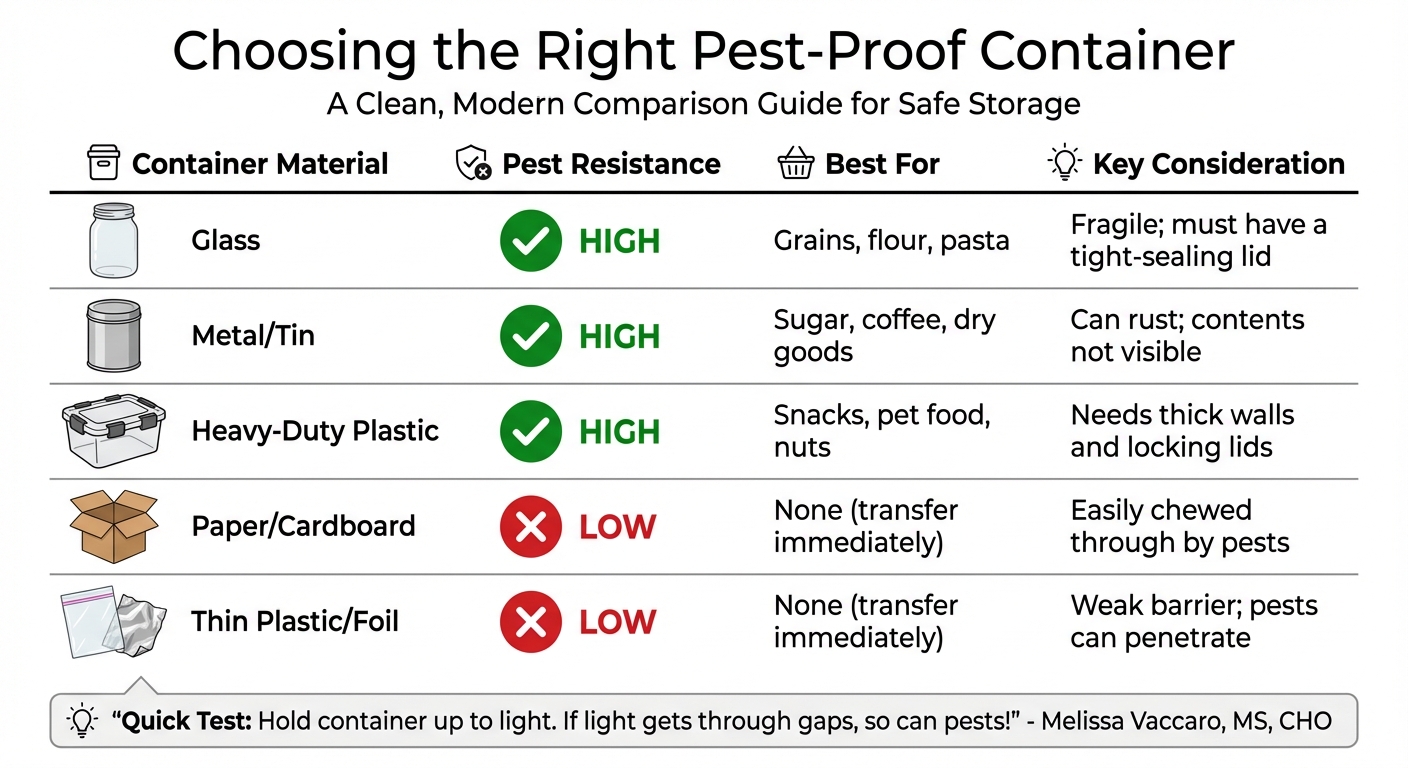
Pest-Proof Food Storage Container Comparison Guide
Keep pests out of your pantry by sealing your food in containers designed to stop infestations.
Best Container Types for Pest Prevention
When it comes to keeping pests at bay, glass jars with airtight lids are a top choice. Opt for jars made of borosilicate glass with silicone or rubber gaskets. These jars are chew-proof and let you visually inspect for any signs of pests.
Metal tins or #10 cans are another solid option. They provide excellent protection and are perfect for storing items like flour, sugar, and grains for the long haul. However, since you can’t see through them, you’ll have to open them to check the contents.
For convenience and durability, heavy-duty plastic containers with locking lids are a great pick. Look for containers with features like four-tab locking systems or snap-on lids for a secure seal. Avoid thin plastic containers or resealable bags - they’re no match for determined pests.
| Container Material | Pest Resistance | Best For | Key Consideration |
|---|---|---|---|
| Glass | High | Grains, flour, pasta | Fragile; must have a tight-sealing lid |
| Metal/Tin | High | Sugar, coffee, dry goods | Can rust; contents not visible |
| Heavy-Duty Plastic | High | Snacks, pet food, nuts | Needs thick walls and locking lids |
| Paper/Cardboard | Low | None (transfer immediately) | Easily chewed through by pests |
| Thin Plastic/Foil | Low | None (transfer immediately) | Weak barrier; pests can penetrate |
To stay ahead of infestations, transfer food from its original packaging as soon as you bring it home. Even sealed store packages can sometimes contain eggs or larvae. For example, a complete set of pest-proof containers might cost around $68, while smaller individual containers are available for about $12.
Before you start using your containers, it’s a good idea to test their pest resistance.
How to Check If a Container Is Pest-Proof
Here’s a quick way to ensure your container is secure: hold it up against a bright light. If light seeps through any gaps, pests can find their way in. As Melissa Vaccaro, MS, CHO, advises, “If light gets through, so can pests.”
Make sure lids fit snugly without any visible gaps. For plastic containers, check for resin identification codes 1, 2, 4, or 5 - these are generally safe for food storage. Another test you can try is placing a small amount of food inside a clear plastic bag and sealing it within the container. Leave it for several days, and if pests are present, they may become visible.
Label and Date Your Stored Food
Once your food is safely stored, take the time to label each container. Use a permanent marker or adhesive labels to write the purchase and expiration dates. This helps you maintain an organized storage system and ensures you’re using older items first (following the "First In, First Out" method). Proper labeling also makes inspections quicker and easier. Many of our happy customers find that these simple storage habits significantly reduce the need for professional intervention.
Finally, always clean your containers thoroughly with soap and water before refilling them. This step removes any leftover eggs or larvae, giving you a fresh start every time.
Organize Your Pantry to Keep Pests Out
A well-organized pantry not only makes life easier but also helps in keeping pests at bay. When your pantry is tidy, it’s much simpler to spot potential problems early. Plus, an organized space eliminates hiding spots for pests. Let’s dive into some straightforward steps to arrange your pantry effectively.
How to Arrange Food in Your Pantry
The way you store food plays a big role in preventing infestations. Start by keeping all food items on shelves, not on the floor. If your pantry is large, maintain at least an 18-inch gap between stored items and the walls. This spacing improves airflow, makes cleaning easier, and ensures you can inspect all areas without obstruction.
Stick to the "First In, First Out" (FIFO) rule. Place newly purchased items behind older ones so you use older products first. This simple habit prevents food from sitting too long, which could attract pests.
Never mix fresh food with older batches. For example, pouring new flour into a container that still has some older flour can lead to contamination if the older batch is infested. Instead, finish the old batch, clean the container thoroughly, and then refill it with fresh food.
Create dedicated storage zones for different types of food. Keeping similar items together in specific areas reduces the number of places pests might target and makes inspections easier. Pair this strategy with pest-proof, sealed containers to add another layer of protection. For ongoing defense, consider a quarterly pest remedy kit to maintain a pest-free environment.
Keep Shelves Clean and Accessible
Once your pantry is organized, maintaining clean and accessible shelves is key to preventing infestations. Avoid cramming items together to the point where you can’t see what’s in the back. Leave enough space to pull items forward easily and check for signs of pests, such as webbing in corners or small holes in packaging.
Regular cleaning helps, too. Vacuum the corners, edges, and backs of shelves to remove crumbs and food particles that might attract pests. After cleaning, ensure shelves are completely dry before restocking, as moisture can encourage pest activity.
If you use shelf liners, make sure they lie flat. Loose or curling liners can create hidden spaces where pests might settle. Additionally, seal any gaps or cracks in your shelves to eliminate potential hiding spots.
Store Perishable Foods Properly
Perishable foods like fruits, vegetables, meat, and dairy need extra attention because they spoil quickly and can attract pests. Proper temperature control and sealed storage are critical. In the U.S., poor storage practices contribute to 48 million cases of foodborne illness and 30–40% of food spoilage annually.
Refrigerator and Countertop Storage
To keep perishables safe, set your refrigerator to 40°F or below and your freezer to 0°F. According to the USDA, "The refrigerator should be at 40 °F or below and the freezer at 0 °F or below". Use appliance thermometers to check these temperatures weekly.
Follow the two-hour rule: don’t leave meat, poultry, seafood, dairy, or produce at room temperature for more than two hours. If the temperature rises above 90°F, reduce this time to just one hour. For produce, transfer items from store packaging into airtight containers to extend freshness and keep pests out. Washing fruits like apples and oranges in a solution of 1/4 cup distilled white vinegar mixed with 10 cups water can help remove residues and any hidden larvae.
Store raw meat on a plate or in a sealed bin on the lowest refrigerator shelf to prevent drips from contaminating other foods. Wrap meat and poultry in foil, plastic, or airtight containers to contain juices and avoid cross-contamination.
For items kept on the counter, hang bananas on a hook to prevent bruising and keep them separate from other fruits that release ethylene gas, which accelerates ripening. Avoid using decorative fruit bowls for long-term storage, as fruit left at room temperature ripens faster and can attract fruit flies. Root vegetables like potatoes and onions should be stored in cool, dark, well-ventilated areas - wire baskets work well to promote air circulation. Keep these vegetables off the floor and at least three feet apart to prevent them from spoiling each other.
While perishables require strict temperature management, bulk foods need secure storage to avoid pest issues.
How to Store Bulk Foods Safely
Bulk items such as rice, beans, and flour are prone to pest infestations if left in the original porous bags they come in. Tracey Besemer, Editor-in-Chief of Rural Sprout, advises: "If you purchase 25lb or larger bags... it's important to store it properly, which is definitely not the bag it comes in". Transfer these goods into airtight glass jars or food-grade plastic containers with locking lids as soon as possible.
Store bulk foods on shelves or pallets at least 18 inches away from walls and off the floor to deter rodents and crawling insects. For large quantities, consider using Mylar bags with oxygen absorbers or food-grade buckets with gamma-seal lids to create a pest-proof environment. To avoid waste, use the "First In, First Out" method: place newly purchased items behind older ones so they’re used in order.
| Storage Method | Effectiveness Against Pests | Best For |
|---|---|---|
| Original Packaging | Low; easily chewed or penetrated | Short-term transport only |
| Airtight Glass/Plastic | High; prevents entry and internal outbreaks | Flour, sugar, cereal, nuts |
| Freezer Storage | Maximum; halts or kills all life stages | Flour, yeast, nuts, seeds |
| Food-Grade Buckets | High; protects against rodents and insects | Bulk rice, beans, grains |
Keep Food Areas Clean
A tidy kitchen is the backbone of effective pest-proofing. Even the best storage containers can’t do their job if crumbs and spills are left behind. As Clemson University Cooperative Extension wisely notes:
The best way to control pests is to keep them out of your home in the first place!
Regular cleaning eliminates food particles and odors that attract pests, making it harder for them to settle near your stored food. A clean environment complements your storage efforts and prevents pests from finding a foothold.
Daily and Weekly Cleaning Tasks
Clean up spills on counters and shelves as soon as they happen. Pests are opportunistic and can lay hundreds of eggs near even the smallest food sources. Their larvae can thrive on tiny crumbs stuck in corners or under cabinets. Use soapy water, vinegar, or an all-purpose cleaner to remove sticky residues and food particles from surfaces.
Scrape food scraps into a covered bin right away, or rinse dishes with hot water to remove any food residue. Keep food storage areas dry, as moisture creates the perfect environment for many pantry pests.
Once a week, tackle harder-to-reach spots. Vacuum behind appliances and along baseboards using a crevice tool to remove food dust, eggs, and larvae. Wipe down the exterior of food containers to prevent sticky residues from attracting pests. Monthly, give trash cans a thorough scrub with hot soapy water and 1/4 cup of chlorine bleach to eliminate odors and bacteria.
In addition to regular cleaning, managing trash and compost properly plays a key role in keeping pests at bay.
Manage Trash and Compost Correctly
Choose garbage cans with tight-fitting lids and line them with bags to keep the interior clean. Empty trash frequently - letting it sit too long can create odors that attract pests. Rinse recyclables before placing them in bins to remove any food residue.
If you come across infested food, seal it in a bag and immediately dispose of it in an outdoor trash can to prevent pests from spreading to other areas of your pantry. Store bulk pet food and birdseed in heavy-duty plastic or metal containers with tight lids, as these items can draw pests like warehouse beetles and Indian meal moths. Also, check and discard old rodent baits periodically, as they can become breeding grounds for pantry insects.
Seal Cracks and Fix Leaks
While proper storage keeps food safe, sealing entry points prevents pests from getting in. Use caulk or putty to seal cracks around sinks, water pipes, and pantry shelves. Install door sweeps and weather stripping to close gaps around doors and windows. Pay attention to areas where vents and pipes enter your home, as these are common access points.
Address leaks and standing water immediately, as these can attract pests. Vacuum cupboard corners and crevices to remove hidden crumbs and eggs. Lastly, replace any missing or broken ceiling and floor tiles to eliminate potential nesting spots.
What to Do If You Already Have Pests
Time is of the essence when dealing with pantry pests. As the University of Minnesota Extension points out:
pantry pests contaminate more food than they eat
Taking swift action can help protect your food and prevent the problem from escalating.
Find and Dispose of Infested Food
If pests have made their way into your pantry, the first step is to identify and get rid of any contaminated items. Carefully inspect every pantry product, including unopened packages, for telltale signs like silk webbing, small holes in packaging, or frass (insect droppings). Look out for live beetles on shelves, moths near light sources, or caterpillars on walls and ceilings.
A helpful trick is the cookie sheet test: spread dry goods onto a sheet to spot larvae, beetles, or webbing more easily. Use a flashlight to check dark corners and the folds of packaging where pests might hide. Once infested items are identified, seal them in a plastic bag and discard them in an outdoor trash can with a secure lid to prevent further contamination.
For items you’re unsure about, you can freeze them at 0°F for at least four days or heat them in an oven at 130°F for 30 minutes to eliminate all stages of pests. Don’t forget to inspect pet food, birdseed, and even dried flower arrangements, as these can also harbor pests.
Clean and Sanitize Affected Areas
Once the infested food is removed, it’s time to deep clean your pantry. Use a vacuum with a crevice tool to thoroughly clean cracks, corners, and shelf edges, ensuring you remove hidden eggs, larvae, and food debris. Immediately dispose of the vacuum bag or contents to avoid reintroducing pests.
Wash shelves and cabinet interiors with warm, soapy water. However, as the University of Minnesota Extension notes:
Washing areas with detergents, ammonia, or bleach will not prevent insect infestation
After cleaning, seal any cracks or gaps in the cupboards with caulk to block potential hiding spots. If moths or pests persist after three weeks, consider using pheromone traps to identify any remaining infestations. Keep monitoring your pantry regularly to ensure the problem is fully resolved.
Consider Custom Pest Control Kits
If pests continue to be an issue despite your efforts, custom pest control kits can provide an effective solution. These kits are designed to target specific pests and are tailored to your home’s needs. They include professional-grade products that are safe for use around pets and children, along with clear application instructions.
For ongoing protection, you can opt for regular shipments and virtual support to help identify pests and apply treatments correctly. Combining proper food storage practices with targeted pest control measures is the best way to ensure your pantry stays pest-free for good.
Conclusion
Keeping pests out of your food storage areas boils down to a few essential habits. Start by storing dried goods in airtight containers made of glass, metal, or durable plastic. Use the "First In, First Out" approach - consume older items before opening newer ones - and avoid buying more than you can use within two to four months. This helps limit how long food sits in storage, reducing the risk of pest issues.
Once your food is stored properly, cleanliness becomes your next line of defense. Regularly vacuum pantry corners and wipe down surfaces with warm, soapy water. Aim to keep storage areas cool (around 65–70°F) and dry, as heat and moisture can speed up pest activity.
If you come across an infestation, don’t delay. Throw out contaminated food in outdoor trash bins and thoroughly clean the affected area. For stubborn problems or ongoing prevention, consider using our custom pest control kits. These kits are designed with professional-grade, pet- and child-safe solutions, offering clear instructions, regular deliveries, and virtual support to help you handle specific pest challenges effectively.
Long-term success depends on sticking to these practices - proper storage, regular cleaning, and vigilant monitoring. As highlighted by NC State Extension:
Sanitation is arguably one of the most important aspects of store product pest control.
FAQs
What are the best containers to keep pests out of my pantry?
To keep pesky invaders like moths, beetles, and weevils out of your pantry, it’s essential to store dry foods in airtight containers made from durable, non-porous materials. Think sturdy plastic with snap-lock or gasket seals, thick glass jars, or metal tins with tight-fitting lids. These materials are tough enough to prevent pests from chewing through or sneaking in.
Here’s what to look for when picking containers:
- Airtight lids: Silicone gaskets or snap-lock designs work best to create a complete seal.
- Strong materials: Opt for BPA-free plastic, tempered glass, or food-grade metal for long-lasting protection.
To further safeguard your pantry, transfer foods out of their original paper, cellophane, or thin plastic packaging into these secure containers. Staying organized and proactive can make a huge difference in preventing infestations. And if you ever spot trouble, Remedy DIY Pest Control kits provide a safe and effective way to protect your pantry and home.
What are the signs of a pest infestation in the kitchen?
To identify a pest problem in your kitchen, start by checking your food and storage areas. Watch for tiny moths hovering around pantry items, beetles on shelves, or chewed holes in food packaging. Other red flags include webbing, powdery residue, or small larvae (which often look like tiny caterpillars) in dry goods like flour, spices, or pet food. You might also come across droppings resembling fine specks or notice a musty smell in warm, humid spots.
If you detect any of these signs, immediately isolate and throw out the affected items. Clean your shelves thoroughly and think about using a DIY pest control kit that's safe for kids and pets to treat the area and prevent pests from returning. To keep your kitchen pest-free, store food in airtight containers, ensure your pantry stays dry, and clean up crumbs regularly.
What should I do if I find pests in my food?
If you find pests in your food, taking swift action is key. Start by disposing of any infested items right away to stop the pests from spreading. Be sure to seal the contaminated food in a plastic bag before throwing it out to contain the problem.
Next, thoroughly clean the storage area using warm, soapy water. This will help eliminate any leftover pests or eggs. To avoid future issues, consider using airtight containers for storing food - they're a great barrier against unwelcome critters. Regularly checking and organizing your pantry can also go a long way in keeping infestations at bay.