

Applying pesticides correctly is essential for solving pest problems while protecting your health, finances, and property. Missteps - like incorrect measurements or poor equipment calibration - can lead to ineffective treatments, wasted money, and environmental risks. Here's what you need to know:
- Preparation: Clear the area, wear protective gear, and review product labels carefully.
- Equipment Calibration: Properly calibrate sprayers to ensure accurate application rates. Even slight errors can impact results.
- Application Methods: Choose between spot treatments, broadcast applications, foliar sprays, or soil treatments based on your pest and area.
- Coverage and Accuracy: Use appropriate nozzles, maintain consistent speed, and monitor boom height to avoid gaps or streaks.
- Minimizing Drift: Control droplet size, spray during optimal weather (3–10 mph wind), and use drift-reducing tools like air-inclusion nozzles.
The Right Dose Chapter 9 - Pesticide Application Procedures
Preparing for Safe Pesticide Application
Getting ready for pesticide application is about more than just following instructions - it's about protecting your family, pets, and property while ensuring the treatment works as intended. The National Pesticide Information Center explains it well: "Using pesticides safely depends on many things. Some of the most important factors include selecting the appropriate product, and using that product according to the label directions".
Start by clearing the area of personal belongings to avoid contamination. If you're applying pesticides outdoors, shut all windows and doors to keep fumes out. Indoors, make sure the space is well-ventilated. Keep children and pets completely out of the area while working with pesticides. For wildlife protection, cover fish ponds and invert birdbaths.
Have a spill kit ready with absorbent materials like sawdust or kitty litter, garbage bags, and non-absorbent gloves. Keep the Poison Control Center number (1-800-222-1222) visible, and review the first aid instructions on the product label before you begin. Wear protective clothing, including long-sleeved shirts, long pants, and closed-toe shoes, along with any additional protective gear specified on the label.
Check the weather forecast. Windy or rainy conditions can not only reduce effectiveness but also create safety risks. Always follow the product label's guidance on weather conditions.
Finally, understanding the product label is non-negotiable - it’s both a safety guide and a legal requirement.
How to Read Pesticide Labels
A pesticide label is more than just a set of instructions - it's a legal document that tells you exactly how to use the product. According to the University of Kentucky, "The 'Directions for Use' section lists the various crops, animals, or sites on which you may legally use the pesticide". Using the product outside of these guidelines is against federal law.
Read the label multiple times: when you purchase the product, before mixing, before application, and before storage. Each step ensures you're using the pesticide correctly - whether it's verifying it targets your specific pest, mixing it properly, applying it under the right conditions, or cleaning up safely.
Pay attention to signal words that indicate toxicity levels. DANGER signals high toxicity, WARNING indicates moderate toxicity, and CAUTION means low toxicity. If you're mixing multiple products, always follow the most restrictive signal word.
The label also specifies required protective gear, such as chemical-resistant gloves, respirators, or face shields. It includes environmental precautions like buffer zones near water sources and warnings about potential harm to bees or aquatic life. For small containers (5 gallons or less), follow triple-rinsing instructions: fill the container 1/4 full with water, shake for 10 seconds, and repeat three times.
Mixing pesticides in the correct order is critical. Typically, you start with compatibility agents, then suspension products (dry formulations before liquids), followed by solution products, surfactants, and finally emulsion products. If the label doesn’t specify tank mix compatibility, do a jar test first to check for clumping, separation, or heat generation.
Once you've mastered the label, the next step is identifying the pest you're dealing with.
Identifying Your Pest Problem
Getting the pest identification right is key to effective treatment. Misidentifying the pest can lead to wasted time, money, and effort. Before buying any pesticide, take the time to identify the pest species and assess how severe the infestation is.
Look for clues like droppings, shed skins, damage patterns, or the pests themselves. Different pests require different active ingredients - what works for ants won’t necessarily work for termites or roaches. The label will list the specific pests the product targets in the "Directions for Use" section.
Understanding the pest's life cycle and behavior also matters. Some pesticides only work on specific life stages, while others require direct contact or ingestion. Knowing where pests hide, when they’re most active, and how they feed can guide your choice of product and application method. For instance, baits are ideal for sensitive areas like daycare centers, where sprays might pose contamination risks.
At Remedy, we simplify pest identification with virtual support, helping you choose products tailored to your specific pest problem and home. Our pest control kits include professional-grade, child- and pet-safe products with straightforward instructions.
Choosing and Calibrating Your Equipment
Using properly calibrated equipment is just as important as following safety protocols. Studies highlight the risks of poor calibration: in North Dakota, 60% of tested sprayers had errors greater than 10%, and in Nebraska, two-thirds of applicators made mistakes exceeding 5%. These errors can impact both effectiveness and costs.
Choose the right nozzles for your task. Flat-fan nozzles work for broadcast herbicide applications, full cone nozzles are best for drift-resistant pre-plant treatments, and hollow cone nozzles are ideal for insecticides that need to reach plant canopies. Nozzle material matters too - ceramic, tungsten carbide, or hardened stainless steel are more durable than brass or plastic, which wear out quickly and can alter flow rates over time.
Calibrate equipment for each user and setup. Walking speeds and hand movements vary, which can affect application rates. Before calibrating, clean your spray rig thoroughly and check for leaks or rust. Use a toothbrush - not a knife or your mouth - to clean clogged nozzles.
For backpack sprayers, try the 1,000-square-foot test: measure how long it takes to spray a 1,000 sq. ft. area with water, then spray into a container for the same amount of time to calculate the volume needed. For larger equipment, use the "ounce method": spray a 1/128th-acre test area and collect the output from one nozzle. Since 128 ounces equal one gallon, the ounces collected correspond to gallons per acre.
Always verify calibration in the field before treating the entire area. Spray a known distance, then refill the tank to see how much was used. Spraying water on dry concrete can also help you check for uniformity - streaks may indicate worn nozzles, incorrect boom height, or uneven pressure. Avoid using kitchen measuring tools for pesticides; instead, rely on dedicated equipment and discard product-specific measuring tubes once empty.
Common Pesticide Application Methods
Pesticide Application Methods Comparison Chart
Now that your equipment is calibrated and safety measures are in place, let’s dive into the main application methods that help ensure effective pest control.
The right method depends on factors like the size of the area, the type of pest, and where the pests are located. For example, broadcast applications are ideal for covering large, uniform spaces like fields or lawns, while spot treatments are better suited for targeting specific areas where pests are concentrated. The type of pesticide - whether liquid, granular, or powder - also influences the equipment you'll need.
Another key factor is the pesticide’s mode of action. Systemic pesticides are absorbed by plants and spread internally, so they don’t require full surface coverage. In contrast, contact pesticides need to coat the target surface entirely to work effectively.
"The label is the law!" - Professor Erdal Ozkan, The Ohio State University
Spot Treatments for Targeted Areas
Spot treatments focus on small, specific areas where pests are clustered. This method is both efficient and reduces unnecessary pesticide use.
For these applications, even-distribution nozzles are essential. They ensure the product spreads evenly across a single spray width without tapering at the edges. Unlike broadcast nozzles, these don’t require overlapping spray patterns. If applying granules to specific plants, place them about 2 inches away from the plant and bury them about 2 inches deep.
Handheld or backpack sprayers work well for residential spot treatments. For instance, if you’re dealing with ant trails near your patio or a patch of weeds in your garden, this approach minimizes product use and limits exposure. Always clear the area of people and pets, and if the label doesn’t specify a restricted-entry interval, wait until the spray has dried or the dust has settled before allowing anyone back.
Broadcast Applications for Large Spaces
Broadcast applications are designed for large, open areas. This method uses flat-fan nozzles, which create a tapered spray pattern. To ensure even coverage, the spray patterns should overlap by 30–50%, preventing streaks or untreated areas.
This method is commonly used for field crops, large lawns, or outdoor perimeter treatments (often called barrier treatments) to create a protective zone that keeps pests out. It’s especially useful for widespread infestations or applying pre-emergent products to stop pests before they become a problem.
Wind conditions play a significant role in broadcast applications. Wind speeds should stay below 10 miles per hour to prevent drift and ensure the pesticide reaches its target. If conditions are windy, it’s best to wait for calmer weather. Proper calibration is also crucial - if your actual application rate differs from the intended rate by more than 5%, recalibrate your equipment.
Foliar, Soil, and Granular Applications
Foliar applications target pests or diseases on plant leaves and canopies. For upper canopy pests like those affecting wheat heads, twin-pattern nozzles or flat-fan nozzles angled at 30–45 degrees work best. For lower canopy pests or dense foliage, single flat-fan nozzles with medium-sized droplets (250–350 microns) provide better penetration. Twin-pattern nozzles, however, are not suitable for lower canopy treatments like those for soybeans.
Soil applications focus on pests or diseases at the plant base or root zone, such as Sclerotinia stem rot. These treatments require nozzles capable of penetrating dense foliage to reach the soil. Soil drenching with a watering can or using specialized injectors works well for root-zone pests or when systemic uptake through the roots is needed.
Granular applications involve spreading solid formulations across the soil using either cyclone or drop spreaders. This method is popular for pre-emergent weed control or treating soil-dwelling pests. Granules don’t require mixing and are less prone to drift, but they must be watered in or incorporated into the soil as per the label instructions. For larger trees, foot-operated sprayers or adjustable nozzles that can switch between fine spray and high-pressure jets are ideal.
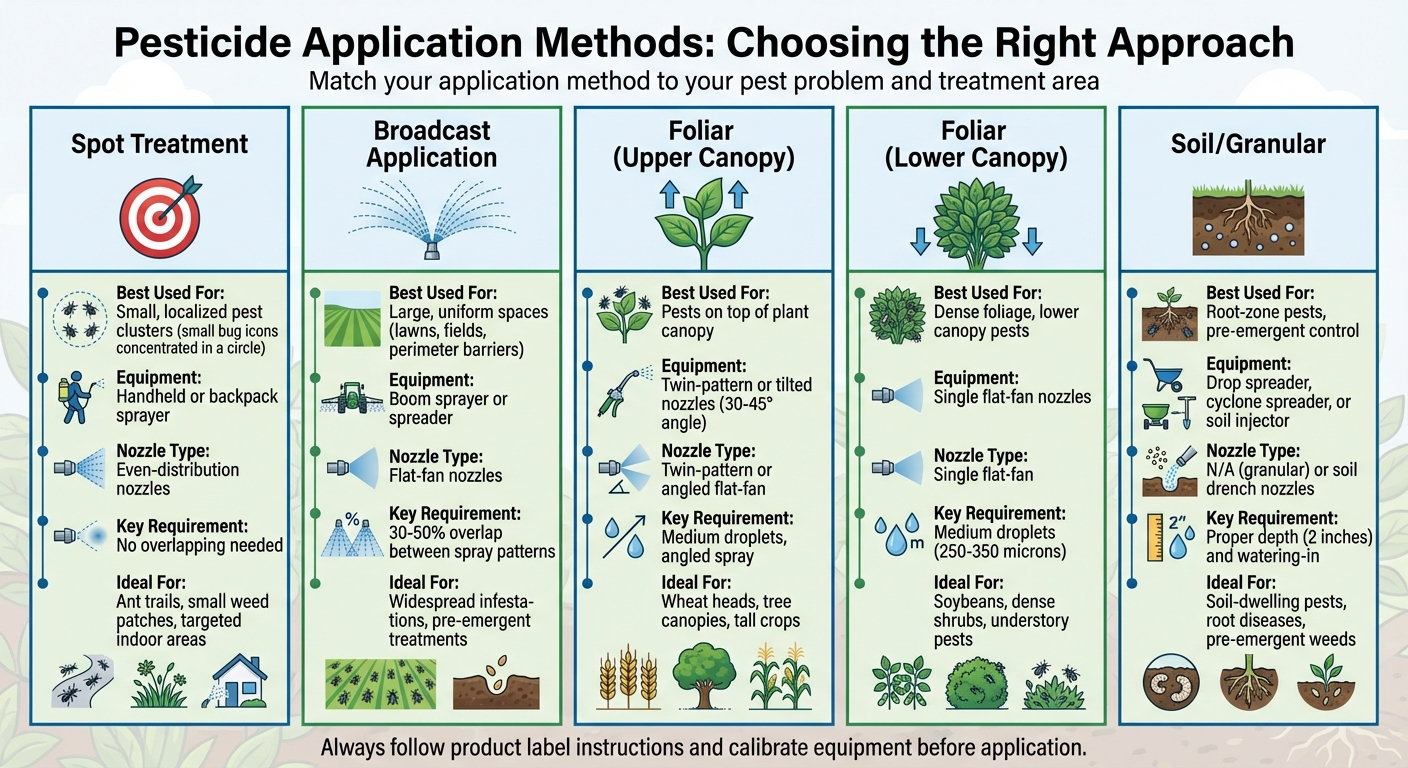
| Application Method | Best Used For | Equipment Example | Requirement |
|---|---|---|---|
| Spot Treatment | Small, localized pest clusters | Handheld or backpack sprayer | Even-distribution nozzles |
| Broadcast | Large, uniform spaces | Boom sprayer or spreader | Flat-fan nozzles (30–50% overlap) |
| Foliar (Upper) | Pests on top of plant canopy | Twin-pattern or tilted nozzles | Medium droplets, angled spray |
| Foliar (Lower) | Dense foliage, lower canopy pests | Single flat-fan nozzles | Medium droplets (250–350 microns) |
| Soil/Granular | Root-zone pests, pre-emergent control | Drop spreader or soil injector | Proper depth and watering-in |
At Remedy, we provide pest control kits with professional-grade products and detailed, step-by-step instructions tailored to your specific pest problem and application method. Whether you’re treating a small area indoors or protecting your entire yard, we’ve got the tools and guidance you need to apply pesticides safely and effectively.
These methods set the stage for achieving the even, effective coverage that we’ll discuss next.
sbb-itb-0bbb908
Tips for Even and Effective Coverage
Achieving even coverage is the key to successful pest control. It ensures you don’t waste product or end up with patchy results. The secret lies in fine-tuning your equipment settings and maintaining consistent application techniques. Let’s break down how nozzle selection and sprayer settings play a pivotal role in getting it right.
Selecting the Right Nozzle and Sprayer Settings
The nozzle you choose has a direct effect on your pesticide coverage. For example, flat-fan nozzles are ideal for applying broadcast herbicides, while hollow cone nozzles create smaller droplets that are better suited for penetrating dense canopies, making them a great choice for insecticides and fungicides. Once you’ve picked the right nozzle, you’ll need to adjust the operating pressure to match.
Pressure settings are more important than many realize. Herbicides typically work best at 10–30 psi, while insecticides and fungicides often require 30–50 psi. Keep in mind that doubling your spray output requires quadrupling the pressure - not just doubling it. Small adjustments can lead to more precise output.
The material of your nozzle also matters for maintaining consistent performance over time. For instance, a brass nozzle can wear down quickly, increasing its flow rate by 10–15% after just 50 hours of use. On the other hand, hardened stainless steel nozzles only experience about a 2% increase in flow rate over the same period. This wear can lead to over-application without you realizing it. Studies from Nebraska and North Dakota revealed that 60% to 66% of applicators were using pesticides incorrectly, often due to worn nozzles disrupting their calibration.
"The nozzle tip is perhaps the most important, yet most neglected, component of the sprayer." – NC State Extension
To avoid these issues, replace any nozzle that shows more than 10% variation from the manufacturer’s output specifications. And when cleaning clogged nozzles, avoid using wire or metal tools - they can damage the nozzle and distort the spray pattern. Instead, use a soft-bristled toothbrush or compressed air.
Once you’ve selected the right nozzle and pressure settings, it’s time to focus on application techniques to ensure consistent results.
Techniques for Consistent Application
Getting the boom height just right is critical for avoiding streaks or gaps in coverage. The proper height depends on your nozzle’s spray angle. For instance, 110° nozzles should be positioned 10–12 inches above the target when spaced 20 inches apart, while 65° nozzles need a height of 21–23 inches. A quick way to test your setup is to spray on a paved surface and observe how it dries. Wet streaks directly under the nozzles could indicate low pressure or worn tips, while streaks between nozzles suggest the height or alignment is off.
For flat-fan nozzles, aim for 30–50% overlap between adjacent spray patterns to achieve uniform coverage. To prevent spray edges from colliding, standard flat-fan nozzles should be angled at approximately 15° to the boom. Cone nozzles, on the other hand, require 100% overlap, meaning each area gets double coverage.
Maintaining a consistent speed is equally important. If you double your speed without adjusting the pressure, your application rate will be cut in half. For hand-held sprayers, ensure a steady pace, consistent nozzle height, and smooth side-to-side motion for even results.
Recalibrate your sprayer if the application rate is off by more than 5%. Using modern tools like Pulse Width Modulation (PWM) technology can help maintain consistent droplet size, even when changes in speed or pressure occur. This ensures more reliable coverage.
At Remedy, we provide professional-grade sprayers as part of our pest control kits, along with step-by-step instructions tailored to your specific needs. With the right tools and guidance, you can achieve even, effective coverage without the guesswork.
Reducing Drift and Improving Accuracy
Drift - when pesticide droplets stray from their intended target - is one of the biggest hurdles in pest control. Managing it effectively not only protects nearby areas and the environment but also ensures your product lands exactly where it’s needed.
Controlling Droplet Size and Weather Conditions
The size of the droplets plays a huge role in minimizing drift. Smaller droplets - those under 100 microns (roughly the width of a human hair) - are much more likely to drift because they’re influenced by air turbulence more than gravity. For context, a 100-micron droplet can drift around 44 to 50 feet in a 3-mph wind, while a 10-micron droplet can travel as far as 3,000 feet. On the other hand, larger droplets, like a 400-micron (coarse) droplet, fall 10 feet in just 2 seconds, whereas a 20-micron (very fine) droplet takes over 4 minutes to cover the same distance.
Here’s a breakdown of how droplet size impacts drift and fall time:
| Droplet Size (microns) | Category | Time to Fall 10 Feet | Lateral Drift (3-mph wind) |
|---|---|---|---|
| 20 | Very Fine | 4.2 minutes | 1,100 feet |
| 100 | Very Fine | 10 seconds | 44 feet |
| 240 | Medium | 6 seconds | 28 feet |
| 400 | Coarse | 2 seconds | 8.5 feet |
| 1,000 | Ultra Coarse | 1 second | 4.7 feet |
Weather conditions are just as crucial. The ideal wind speed for spraying is 3 to 10 mph. If the wind drops below 3 mph, you risk encountering a temperature inversion - a phenomenon where cool air near the ground gets trapped by warmer air above. This prevents droplets from settling and allows them to drift horizontally for miles. You can check for inversions with a simple smoke test: light a small fire or smoke bomb, and watch the smoke. If it moves horizontally near the ground instead of rising, it’s not the right time to spray.
"Potential off-target movement needs to be a primary consideration for all pesticide applications." – Greg R. Kruger, Pesticide Application Technology Specialist
High temperatures and low humidity also pose challenges. When humidity drops below 40% or temperatures exceed 77°F, droplets evaporate faster, shrinking in size and becoming lighter, which makes them more prone to drift.
To reduce drift, keep your boom as low as possible while ensuring even coverage. For 110° nozzles spaced 20 inches apart, set the boom height between 16–18 inches above the target. Another effective technique is using air-inclusion (venturi) nozzles, which mix air into the liquid to produce larger, drift-resistant droplets that still break apart on impact for thorough coverage. Studies show these nozzles can cut spray drift by 50% to 95% compared to standard nozzles.
With these strategies in mind, let’s look at how modern equipment can take precision to the next level.
Using Tools for Better Precision
While droplet size and weather control are key, modern tools can make pesticide application even more accurate. Air-assisted sprayers, for instance, use fan-generated air streams to push droplets deeper into dense crop canopies, improving coverage while reducing drift. To get the best results, adjust the fan’s airflow so it replaces the air within the canopy without pushing droplets out the other side.
Adjustable deflector plates on airblast sprayers are another helpful feature. These plates let you direct the air and droplets exactly where they’re needed, avoiding upward or horizontal drift. A quick tip: tie ribbons to the sprayer fan to visualize the air’s path, then fine-tune the deflector plates to match your target height. And if your nozzles aren’t aimed at the canopy, turn them off - there’s no point in wasting product by "spraying the sky".
For immediate feedback on your coverage, use water-sensitive papers. These papers turn blue when hit by spray droplets, helping you see if your coverage is adequate or if droplets are overshooting the target. Aim for 25% to 35% surface coverage or 450 to 600 droplet stains per square inch.
Lastly, don’t overlook nozzle maintenance. Worn nozzles can lead to uneven output and increase drift. Regularly inspect and replace any that show wear to maintain consistent performance.
At Remedy, we provide professional-grade kits and detailed guidance to help you reduce drift and achieve precise application. From weather monitoring tips to nozzle selection and tailored techniques, we’ve got you covered - so you can protect your home and surroundings with confidence.
Conclusion
Applying pesticides effectively hinges on three key elements: preparation, precision, and safety. Start by identifying the pest you’re dealing with, carefully reading the product label, and calibrating your equipment to ensure the application rate stays within a 5% margin.
Once you’ve laid the groundwork, focus on achieving a consistent and drift-free application. Select the appropriate nozzle for your target, maintain a steady speed and proper boom height, and keep an eye on weather conditions to minimize drift. Be sure to replace worn nozzles promptly to avoid streaking or uneven coverage.
Safety doesn’t stop with personal protective gear during application - it also involves proper equipment care. Clean your sprayer immediately after use, following the instructions on the product label, to extend its lifespan and prevent costly repairs.
At Remedy, we provide professional-grade kits and straightforward instructions designed to help you tackle pest control with confidence. Our products include the tools and support you need to apply pesticides safely and effectively, protecting both your home and the environment.
FAQs
What are the best practices for safe and effective pesticide application?
To use pesticides safely and get the best results, preparation is essential. Start by identifying the specific pest you’re dealing with and choose a product that’s labeled to address it. Take the time to carefully read the product label - it will tell you the correct application rate and whether any additives are needed. Use a calibrated measuring tool to ensure accuracy, and mix the pesticide thoroughly in the tank for even distribution.
Before you begin applying, make sure your sprayer is properly calibrated to provide consistent coverage across the treatment area. Timing and conditions matter, too: aim to apply pesticides when the wind is calm (under 5 mph), temperatures are moderate, and there’s no rain in the forecast. This helps reduce drift and ensures the pesticide works as intended.
Safety is non-negotiable. Always wear personal protective gear like gloves, goggles, and long sleeves, and follow any specific precautions listed on the product label. When you’re done, store pesticides in a secure, cool, and dry place, well out of reach of children and pets. Dispose of empty containers according to your local regulations to keep your home and environment safe.
By taking these steps, you can manage pests effectively while prioritizing safety for your family and surroundings.
How can I reduce pesticide drift during application?
Pesticide drift occurs when spray droplets or dust veer off from the intended target area. This not only reduces the effectiveness of the application but can also pose risks to people, pets, wildlife, and nearby water sources. To limit drift, aim to produce larger droplets and apply pesticides during calm weather conditions.
Using low-drift nozzles and adjusting your sprayer’s pressure to generate droplets larger than 100 microns can significantly reduce the chances of wind carrying them away. You can also lower pump pressure, increase spray volume, and incorporate drift-reducing agents, such as polymers or oil-based products, into your mix. Don't forget to calibrate your equipment before each use, and consider using shields or deflectors to block wind from interfering with your application.
Timing your application is equally critical. Ideal conditions include wind speeds below 5 mph, temperatures under 90°F, and moderate humidity. Early mornings or late evenings often provide the best environment for spraying. Additionally, ensure that people, pets, and children stay clear of the area until the spray has fully settled. By combining the right equipment settings with thoughtful timing, you can apply pesticides effectively while minimizing risks to your surroundings.
Why should I calibrate my sprayer, and how often is it necessary?
Calibrating your sprayer is a crucial step to make sure you're using the right amount of pesticide as directed on the product label. This helps avoid over-application, which can damage plants, pollute water sources, and lead to pest resistance. It also prevents under-application, which might leave pests untreated, wasting both your time and effort.
It's important to calibrate your sprayer at the start of each spray season, whenever you adjust nozzles or pressure settings, or if you notice uneven spray patterns or inconsistent flow rates. For optimal performance, it’s smart to double-check the calibration before every application.