

Pests can cause serious damage and health risks, but regular home inspections help you stop problems before they start. Here's why inspections matter and how they save you time, money, and stress:
- Cost Savings: Routine inspections ($100–$250) are far cheaper than repairing damage from infestations ($1,000–$5,000). Termites alone cause billions in damage annually.
- Health Protection: Pests like rodents and cockroaches spread diseases and trigger allergies. Early detection prevents these risks.
- Home Safety: Inspections reveal vulnerabilities like gaps, moisture, or structural issues that attract pests.
- Seasonal Focus: Adjust inspections to match pest activity - spring and fall are key times to act.
- DIY & Professional Tools: Use UV flashlights, moisture meters, and thermal imaging to spot early signs like gnaw marks, droppings, or mud tunnels.
Regular inspections not only protect your wallet but also safeguard your family and home from pests. Pair inspections with targeted treatments, like Remedy kits, for added protection.
Looking For Home Pests - #21 House Inspection Checklist
How Regular Inspections Prevent Pest Infestations
Regular inspections help catch pest issues early, often before they spiral out of control. They reveal weak spots in your home’s defenses, allowing you to address potential problems before pests even get inside. This proactive approach not only saves money but also spares you the stress of dealing with a full-blown infestation. Here’s how inspections identify entry points, detect early warning signs, and help reduce long-term damage.
Finding Pest Entry Points
Pests can squeeze through the tiniest gaps, and professional inspectors are trained to spot these vulnerabilities. They check your home’s exterior - walls, roof, windows, doors, and foundation - for potential entry points like loose shingles, unscreened vents, or gaps around chimneys. Areas where utility lines enter the house are another common weak spot. Inspectors use tools like telescopic mirrors and flashlights to examine crawl spaces, wall voids, and other hard-to-see areas. They also assess conditions like moisture buildup or overgrown vegetation, which can attract pests.
Spotting Early Signs of Infestation
Early detection hinges on noticing subtle signs that might escape your attention. Inspectors look for telltale clues like gnaw marks on food packaging, wires, or drywall - clear indicators of rodents. Other signs include shredded insulation, strange noises coming from walls or ceilings, and lingering musty smells. Tools like UV flashlights can reveal urine stains, while small mud tunnels near damp areas may point to termite activity. Identifying these warning signs early allows for swift action, preventing the problem from escalating.
Reducing Long-Term Damage
Catching pest issues early can save you from costly repairs down the line. Termites and carpenter ants, for example, often cause extensive damage inside walls, under floors, and in foundations before you even notice a problem. Termites alone are responsible for billions of dollars in structural damage annually. Rodents are another major concern; their constant gnawing on electrical wires can lead to short circuits, power outages, or even fires. Since most homeowners' insurance policies don’t cover pest-related damage, regular inspections can help you address issues while they’re still manageable, potentially saving you thousands of dollars in major repairs or emergencies.
Creating a Home Inspection Schedule
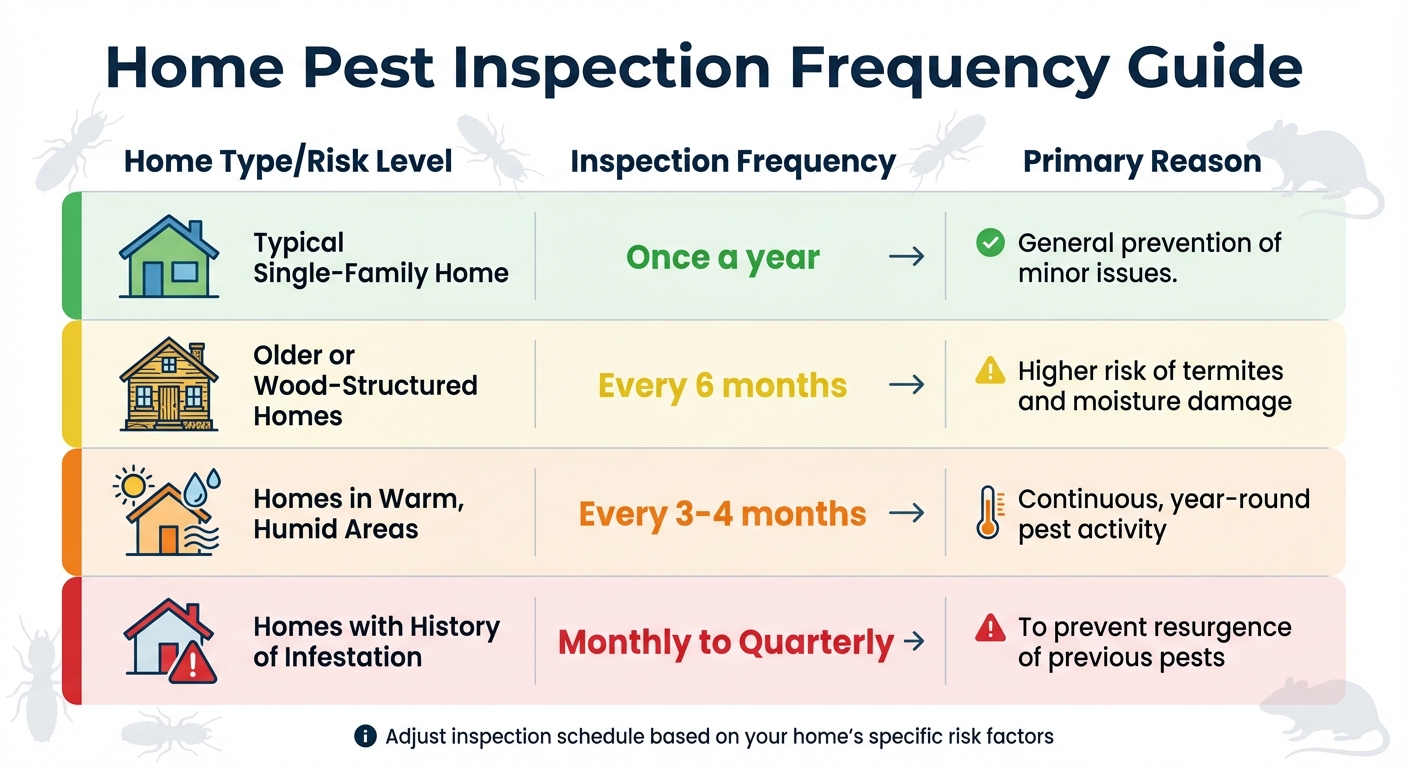
Home Pest Inspection Frequency Guide by Risk Level
Your home’s inspection routine should match its specific risks. While most homes benefit from an annual inspection, factors like climate, building materials, and past pest problems may call for more frequent checks. Adjusting your schedule this way can help avoid costly surprises.
Factors That Determine Inspection Frequency
Several elements influence how often your home needs an inspection. For example, older homes or those built with wood are more prone to issues like termites or moisture damage. These homes might require inspections every six months. If your home has dealt with pest infestations before, you may need to schedule monthly or quarterly checks to prevent a relapse.
Climate also plays a big role. Warm, humid environments create ideal conditions for pests, often requiring inspections every three to four months. Homes near wooded areas, dense vegetation, or standing water face similar risks and should be monitored regularly.
| Home Type / Risk Level | Recommended Inspection Frequency | Primary Reason |
|---|---|---|
| Typical single-family home | Once a year | General prevention of minor issues |
| Older or wood-structured homes | Every 6 months | Higher risk of termites and moisture damage |
| Homes in warm, humid areas | Every 3–4 months | Continuous, year-round pest activity |
| Homes with history of infestation | Monthly to Quarterly | To prevent a resurgence of previous pests |
By following these guidelines, you can align inspections with your pest prevention efforts and seasonal pest activity.
Seasonal Inspection Tips
Seasonal changes bring different pest challenges, so tweaking your inspection schedule accordingly can give you an edge. Spring and fall are especially crucial. In spring, pests start breeding as they emerge from hibernation, while fall sees rodents and insects seeking indoor shelter from the cold. In warmer southern areas, where pests like termites and cockroaches stay active year-round, scheduling at least two professional inspections annually is wise.
Here’s what to focus on each season:
- Spring (March–May): Check for and seal any exterior cracks, and inspect window screens for damage.
- Summer (June–August): Trim tree branches to keep them at least 6 feet away from your roof and maintain at least 12 inches of clearance between plants and your home’s walls.
- Fall (September–November): Clean gutters, seal gaps with caulk or steel wool, and move firewood piles at least 20 feet away from your home.
- Winter (December–February): Inspect plumbing for leaks and check attics or crawl spaces for signs of rodents.
Step-by-Step Guide to Inspecting Your Home
Taking the time to inspect your home can help you catch early signs of pest activity before they turn into bigger problems. But to do it right, you’ll need the proper tools, a DIY pest control kit, and a clear plan. Start by gathering everything you’ll need: a high-powered flashlight, a UV flashlight to spot urine stains, a magnifying glass for tiny details, telescopic mirrors for hard-to-see spots, binoculars for checking the roof, and protective gloves.
"Starting off your inspection with the right equipment at hand makes the job faster and more efficient." – Gemma Johnstone, Contributing Writer, Angi
Before diving in, clear out clutter from key areas like garage walls or under sinks. This will make it easier to spot potential pest activity in those hidden spaces. Once everything is cleared, you can begin a room-by-room inspection.
In the kitchen, look behind appliances and under cabinet toe kicks for crumbs, droppings, or other signs of pests. Bathrooms often have moisture-prone spots, so check grout and other damp areas carefully. In attics and basements, keep an eye out for nesting materials or chewed utility lines - both common signs of activity. After you’ve gone through the interior, it’s time to move outside.
When inspecting your home’s exterior, check for cracks in the foundation and ensure there’s at least a 12-inch gap between plants and the walls. Use binoculars to examine roof shingles and vents for nests or damage, clear out gutters, and don’t forget to inspect any incoming packages for unwanted hitchhikers.
If you’re dealing with ants, you can use a small dab of honey or peanut butter to trace their trails back to the nest. It’s a simple trick that can save you a lot of guesswork.
Keep track of your findings by marking them on a floor plan of your home. Pay special attention to corners - if cobwebs reappear quickly after cleaning, it could mean spiders are actively hanging around. In crawlspaces, look for termite mud tubes, especially near water heaters, as these can indicate a more serious issue.
Exterior Inspection Checklist
Protecting your home from pests starts with a thorough inspection of the exterior. Begin at the foundation. Look for cracks, gaps where pipes or cables enter, and any wood that touches the soil. Keep wooden structures at least 6 inches above ground to discourage termites. Even small cracks matter - use a magnifying glass to check their depth.
Shift your focus to the roofline and eaves. Binoculars can help you spot missing shingles, gaps in soffits or fascia, and vents that aren’t screened. Pay special attention to the chimney and roof vents, as these are frequent entry points for animals like bats, squirrels, and birds. Any damaged flashing or masonry gaps should be repaired right away.
Don’t overlook windows and doors. Examine screens for even the smallest tears, as insects can easily slip through. Press on wooden frames to check for softness, a sign of rot, and replace any that feel mushy. Inspect weather stripping around doors and windows, as worn or missing strips can create gaps that welcome crawling pests.
Gutters and downspouts are another critical area. Clogged gutters can lead to standing water, which attracts mosquitoes, termites, and even cockroaches. Clean your gutters twice a year - once in spring and again in fall - and make sure downspouts direct water away from the foundation. Overflowing gutters can rot fascia boards, creating a haven for wood-destroying pests.
Lastly, walk the perimeter of your home. Trim back branches and shrubs so they’re at least 6 feet from the house, and keep plants at least 12 inches away from walls or the foundation. Avoid piling mulch directly against the house; pull it back at least 6 inches to avoid creating shelter for rodents and insects. Store firewood on raised racks, well away from the house, to prevent termites from making their way indoors.
| Exterior Area | What to Check | Common Pests |
|---|---|---|
| Foundation | Cracks, utility gaps, wood-to-soil contact | Ants, spiders, termites, rodents |
| Roof & Attic | Missing shingles, gaps in eaves, chimney caps | Bats, squirrels, raccoons, wasps |
| Windows/Doors | Torn screens, weather stripping, wood rot | Flies, mosquitoes, spiders, roaches |
| Gutters | Debris, standing water, leaks | Mosquitoes, termites, carpenter ants |
| Vents | Missing covers, damaged dampers | Rodents, birds, stinging insects |
| Perimeter | Overhanging branches, mulch, firewood | Ants, termites, ticks, rodents |
With the exterior secured, it’s time to turn your attention indoors to check for hidden pest entry points.
sbb-itb-0bbb908
Interior Inspection Checklist
Once the exterior is secure, it’s time to focus on the inside of your home. Pests often find ways to settle indoors, so a thorough inspection is key. Start with the kitchen, as it’s a hotspot for food and water, which attract pests. Each season, move your refrigerator and check behind it for greasy rub marks that pests leave behind. Don’t forget less obvious places like the warming drawer under your oven, the "toe kick" area beneath floor cabinets, and behind the dishwasher panel, where you might find nesting materials or droppings that resemble black pepper or coffee grounds.
In the bathroom, moisture is the main draw for pests. Look under sinks for leaks and inspect the grout around tubs and toilets for signs of damage. Organic buildup in drains can also attract pests, so give those a close look. If you notice a musty, pungent smell, it could signal cockroaches, while a coriander-like odor might point to bed bugs. A moisture meter can help you identify areas of high humidity - keeping levels below 50% can make your home less inviting to pests.
Don’t overlook elevated or less-used spaces like the attic. Check insulation, wall voids, and cardboard storage for rodent nests, and switch out cardboard boxes for sealed plastic containers. Keep an eye out for small termite tunnels near moisture sources and inspect utility lines for chew marks. A UV flashlight can help spot rodent urine stains that aren’t visible otherwise.
The basement and crawlspace are also worth a detailed look. Focus on dark, damp corners. Rodents often chew wires near the fuse box, termites may gather around the water heater, and heat and humidity behind the washer and dryer can attract pests. Look for spliced wires, spider webs, and moisture stains on walls or floor joists.
In living areas and bedrooms, use a magnifying glass to inspect mattress seams for signs of bed bugs, such as blood stains or dark excrement spots. Check baseboards, closets, and window sills for insect body parts, droppings, or shed skins.
| Room | Specific Inspection Points | Common Signs to Look For |
|---|---|---|
| Kitchen | Behind fridge, under sink, pantry, dishwasher | Crumbs, greasy rub marks, droppings, chewed packaging |
| Bathroom | Drains, shower grout, under toilet, cabinets | Standing water, mold, silverfish, damp wood |
| Attic | Insulation, rafters, storage boxes, vents | Nests (shredded paper/insulation), droppings, chew marks |
| Basement | Floor joists, water heater, fuse box, washer/dryer | Termite tunnels, spliced wiring, cobwebs, moisture |
| Living Areas | Baseboards, closets, window sills | Bed bug spots, cast skins, shed skins |
For any gaps you find around pipes, cables, or wires, seal them with steel wool and caulk. Rodents struggle to chew through steel wool, making it an effective barrier. Pay attention to scratching or squeaking noises in walls and ceilings - these sounds often hint at hidden pest activity. By combining this interior inspection with your exterior efforts, you’ll leave pests with nowhere to hide.
When Immediate Inspections Are Necessary
Routine inspections are important, but some situations call for immediate action. For example, chewed electrical wires can create serious fire hazards and require professional attention right away. If you notice frayed or spliced wires, it’s not something to ignore - act quickly.
Unusual noises coming from walls, ceilings, or floors are another red flag. These sounds often point to active pest activity, making an urgent inspection essential.
"By the time you notice them, it's often too late. A professional pest inspection helps you identify early warning signs before they escalate into significant repair costs." – CalPro Inspection Group
Signs of structural damage, such as hollow wood, sawdust piles, or mud tubes, are clear indicators of termites or carpenter ants. These pests can cause extensive damage and need immediate attention. Termites alone account for billions of dollars in damage annually, with U.S. property owners spending over $2 billion each year on treatments. On top of that, spotting droppings, urine stains, or live pests is a serious health concern. These signs can indicate risks like hantavirus, leptospirosis, or salmonella.
To stay proactive, document any findings with photos and notes, then contact a licensed pest professional without delay. While waiting for help, take steps to minimize attractants: seal food in airtight containers and fix leaky pipes. Acting early can save you thousands in repair costs compared to dealing with a full-blown infestation.
Using Remedy Kits for Ongoing Pest Prevention

Proactive home inspections are a great first step, but Remedy kits take pest prevention to the next level. These kits offer a targeted, efficient treatment option that works hand-in-hand with your inspection efforts. Once you've identified problem areas, Remedy kits provide professional-grade protection without breaking the bank.
How Remedy Simplifies Pest Control
Each Remedy kit is tailored to your specific pest problem and location, using EPA-approved formulas designed to tackle pests like ants, spiders, cockroaches, and even scorpions. Inside every kit, you'll find everything you need: a battery-powered sprayer, application bag, pesticide bottle, protective gloves, and an easy-to-follow instruction sheet. These products are designed with safety in mind, becoming safe for children and pets once the spray has dried.
Emily, a satisfied customer, shared her thoughts:
"Very happy! It was very easy to set up and it's a very generous amount for how much I paid."
At under $30 per shipment, Remedy kits are an affordable alternative to professional pest control services, which can cost upwards of $500 annually.
Adding Remedy Kits to Your Inspection Routine
For the best results, coordinate your Remedy treatments with your regular inspections. Use the reapplication reminder as a prompt to conduct a thorough property walkthrough. Start by checking the exterior foundation, doors, and windows for cracks or gaps, and apply the spray to create a protective barrier around these entry points. Any leftover product can be used indoors for spot treatments in high-risk areas like behind appliances, under sinks, or along baseboards.
Jen Y., another customer, highlighted her experience:
"This took care of it. Happy with the ease & quality of the products. Highly recommend."
With the option to cancel, skip, or pause your subscription at any time, Remedy kits give you full control over your pest prevention plan. This seamless integration into your routine strengthens your overall pest management strategy.
Conclusion
Regular inspections are a smart way to avoid expensive pest damage by addressing issues early - whether it's termites quietly eating away at your foundation or rodents gnawing on electrical wires. This proactive step not only safeguards your wallet but also protects your family’s well-being by stopping pests before they can spread and cause significant trouble.
To build on these advantages, our Remedy kits offer an extra layer of protection. After identifying weak spots during your inspection, these professional-grade products help you establish a barrier that keeps pests out. It's an effective and budget-friendly way to stay protected between inspections.
Routine inspections also break pest life cycles and shield your home's structure. Timing these checks with seasonal pest activity, as discussed earlier, ensures you’re getting the most out of your efforts. As Mike Pantazis, Service Manager at Ecotech Pest Control, explains:
"Understanding the importance of regular pest inspections and maintenance is the first step toward protecting your home, health, and investment".
Set up a consistent inspection routine and combine it with preventive treatments to keep your home pest-free all year long.
FAQs
How often should I have my home inspected for pests?
For most households, scheduling a pest inspection once a year is a solid practice to catch any potential problems before they escalate. But if your home is older, constructed with wood, or located in an area with heavy pest activity, you might need inspections more often - every six months or even quarterly.
Homes in humid regions or areas with pests like termites, rodents, or ants can benefit from quarterly inspections to stay ahead of infestations. Ultimately, the best schedule depends on your home's age, location, and specific risks, but consistent inspections are key to maintaining a pest-free environment.
What are the early signs of a pest infestation to watch for?
Spotting a pest problem early can save you a lot of hassle - and some cash too. Be on the lookout for droppings, which often appear as tiny black specks (think ground pepper), or scratching sounds coming from your walls or ceilings, a telltale sign of rodents. You might also spot gnaw marks, damaged plants, or nesting materials like shredded paper or fabric.
Other red flags include shed insect skins, egg cases, or even structural damage. For instance, termites or carpenter ants can weaken wood, while fine sand or soil pushing through cracks in concrete might point to tunneling pests like pavement ants. Keeping an eye out for these signs and scheduling regular inspections can help you tackle the problem before it spirals out of control.
How can Remedy kits make routine pest inspections more effective?
Remedy kits make routine pest inspections easier and more effective by offering tailored pest control solutions designed specifically for your home and pest concerns. These kits come with professional-grade products that are safe for both pets and children, along with simple, easy-to-follow instructions. This setup allows you to confidently treat and monitor pest activity on a regular basis.
Using Remedy kits as part of your inspection routine helps you stay ahead of potential pest issues. By addressing problems early, you can avoid them escalating into major infestations. With the added convenience of recurring shipments and virtual support for identifying pests, keeping your home pest-free becomes a hassle-free part of your regular maintenance.