

Pheromone traps are an effective, non-toxic way to monitor and manage specific pest species in your home. These traps mimic natural insect communication signals to lure pests into sticky traps, helping you detect infestations early and reduce pest populations. To get the most out of pheromone traps, follow these steps:
- Identify the pest: Each trap is designed for a specific species, like Indian meal moths or clothes moths. Proper identification ensures the right trap is used.
- Gather supplies with a DIY pest control kit: You’ll need the correct pheromone lure, a suitable trap type (delta or wing-style), and tools like gloves and markers for setup and maintenance.
- Follow instructions: Place traps at the correct height and location based on the pest's behavior. Avoid areas with strong airflow or competing scents.
- Monitor and maintain: Check traps weekly, replace lures every 60–90 days, and clean surrounding areas to maximize effectiveness.
These traps are safe for use around children and pets, making them ideal for kitchens, closets, and other sensitive areas. Proper setup and consistent monitoring are key to managing pests effectively.
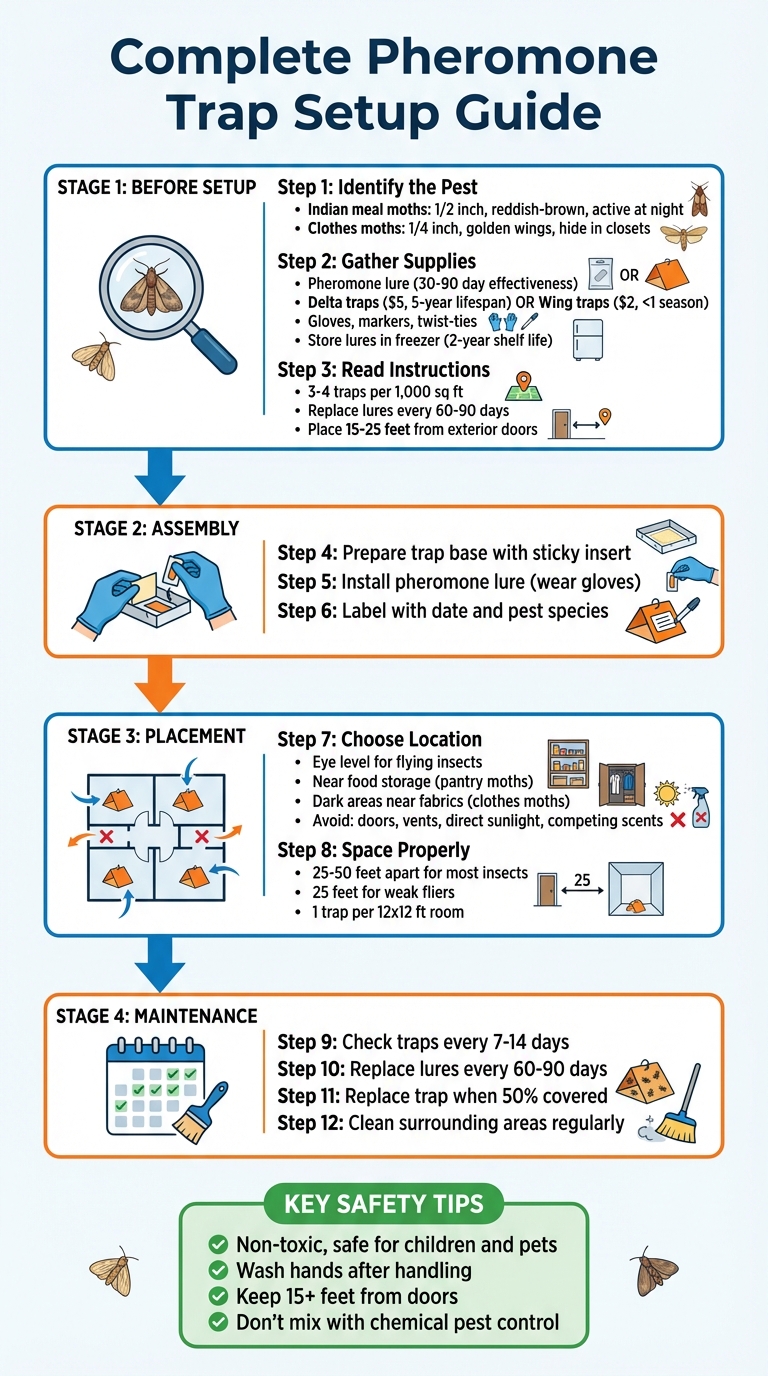
Step-by-Step Guide to Setting Up Pheromone Traps for Home Pest Control
Before You Set Up Your Traps
Identify the Pest You're Dealing With
The first step in setting up effective traps is knowing exactly which pest you're targeting. Pheromone traps are designed to attract specific species, so using the wrong lure will leave you with an empty trap, no matter how well it's set up.
For instance, Indian meal moths, often found in pantries, are about 1/2 inch long with reddish-brown markings and a coppery sheen on their wings' lower two-thirds. These moths are typically active at night and are commonly spotted in kitchens. In contrast, webbing clothes moths are smaller, around 1/4 inch long, with golden wings and red hair tufts on their heads. They tend to run rather than fly and hide in dark closets when disturbed.
Clues left behind can also help identify the pest. Indian meal moth larvae, for example, create fine silken webbing and clump grains in food packages. These larvae are yellowish, greenish, or pinkish, with dark brown heads, and measure about 1/2 to 5/8 inch in length. Clothes moth larvae, on the other hand, damage natural fibers like wool, fur, and feathers. Look for evidence in the corners of boxes or creases of bags - these larvae can even chew through plastic and thin cardboard.
"Identifying the insect and understanding their biology is the first step to an effective integrated pest management and pheromone monitoring program." - Ethan Estabrook, BCE, Research Entomologist, Insects Limited
If you're unsure about the pest you're dealing with, virtual pest identification services are available to help you select the right trap for your needs.
Once you’ve identified the pest, it’s time to gather the right tools for the job.
Gather Your Supplies
Your most critical tool is the pheromone lure, which must match the pest you've identified. Standard lures last about 30 days, while extended-use versions can remain effective for 60 to 90 days.
You’ll also need to choose between Delta traps and wing-style traps. Delta traps, typically orange to avoid attracting bees, are reusable and can last up to five years. They cost around $5.00 each and use replaceable sticky liners for easy maintenance. Wing-style traps, on the other hand, are more affordable at about $2.00 each but generally last less than a season.
To secure your traps, use twist-ties or adhesive backing. Keep a marker or pen handy to label traps with the date and target species - this helps track replacements and prevents cross-contamination. A Popsicle stick and paper towels can help extend the sticky surface's life by removing dead insects.
"Store lures in the freezer at all times until deployment in the field or they will lose effectiveness. Properly stored lures last 2 years." - Utah State University
Unused lures should be stored in the freezer, where they can remain effective for up to two years. Customized pest control kits are also available, offering professional-grade, pet- and child-safe products tailored to your specific pest issue.
With your supplies ready, the next step is to carefully review the product instructions.
Read the Product Instructions
Proper usage is key to ensuring your traps work as intended. The product label will specify how many traps to use for a given area. For example, in smaller residential spaces, you’ll typically need 3 to 4 traps per 1,000 square feet. Using too many traps in a confined area can create "competition", making it harder for pests to locate any single trap.
Pay close attention to the lure replacement schedule. Most pheromone lures are effective for only 60 to 90 days, so failing to replace them on time can undermine your entire pest monitoring effort. The label will also outline storage requirements, as pheromones are highly volatile and must be kept in a freezer or refrigerator to maintain their potency.
Placement and orientation are equally important. Some traps should hang at eye level to attract flying insects, while others should be placed on the floor for crawling pests like beetles. It's generally recommended to position traps at least 15 to 25 feet away from exterior doors to prevent outdoor pests from being lured inside. Temperature can also affect trap performance - most stored product insects stay inactive below 65°F, and pheromone effectiveness changes at temperatures above 95°F.
"How often lures should be changed depends on the type of pheromone lure and the manufacturer's guidelines." - Ethan Estabrook, BCE, Research Entomologist, Insects Limited
Lastly, follow any specific assembly instructions. For example, with "Bullet Lures", the cap should not be cut off. Taking the time to review these details will ensure your traps are set up for success.
sbb-itb-0bbb908
How to Assemble Your Pheromone Traps
Prepare the Trap Base
Start by unpacking your trap base and locating the sticky insert. To avoid contaminating the pheromone lure with natural oils from your skin, wear disposable gloves before handling any components. Carefully peel off the protective paper covering the sticky surface. Assembling the trap in the right order is key to keeping the adhesive off your hands and the lure. If you're using a reusable delta trap, double-check that it’s clean and has only been used for the same pest species - this prevents cross-contamination. Once the base is prepped, you’re ready to install the pheromone lure.
Install the Pheromone Lure
Take the pheromone lure out of storage just before use to keep it potent. Lures come in several forms, such as red rubber septa, capsules, or Bullet Lures. If you’re working with a Bullet Lure, don’t cut the cap - it’s designed to maintain the lure's effectiveness.
For rubber septum lures, use a plastic-headed sewing pin (1.5 to 2 inches long) to secure the septum so it hangs horizontally above the sticky base. This position helps the pheromones disperse evenly throughout the trap. For other lure types, simply place them directly onto the center of the sticky surface.
"Wearing disposable gloves, pick up the septum, reach inside the trap and stick the pin through the septum widthwise so it hangs horizontally above the bottom of the trap."
- Diane Brown, MSU Extension
If you’re setting up traps for different pest species, change gloves between assemblies to avoid cross-contamination. Once the lure is installed, slide the sticky insert back into the trap base, ensuring it’s securely in place.
Label the Trap with the Date
With the trap fully assembled, label it right away. Use a permanent marker to write down the target pest species and the installation date on the trap housing. This step is crucial because lures lose their identifiable markings once unsealed. Doug Johnson, an Extension Entomologist from the University of Kentucky, emphasizes:
"Always label the trap with the name of the species you are trapping and the date the bait was changed. Once the bait is out of the package you can not tell what it is."
- Doug Johnson, Extension Entomologist, University of Kentucky
Labeling helps you monitor the lure’s effectiveness, which typically lasts 30 to 60 days, so you’ll know when it’s time to replace it. If you’re deploying multiple traps across different areas, add location identifiers (like "Kitchen-1" or "Closet-2") to keep your records organized. This practice also aids in determining a "biofix" - the date when you first notice consistent pest activity - which is a valuable tool for predicting when pests might reach their most harmful stages.
Where to Place Your Traps
Choose the Right Location
Height matters for placement. For flying insects like pantry moths and clothes moths, traps work best when positioned at eye level. This makes it easier to inspect them while ensuring they function effectively. Ethan Estabrook, Research Entomologist at Insects Limited, advises:
"Hang pheromone monitors at eye level, where they will not be damaged, that allows easy access to inspect for insect captures."
Match the trap's location to the pest's behavior. Pantry moth traps should be placed near food storage areas such as pantries, kitchen cabinets, or anywhere you keep grain products, cereal, nuts, dried fruit, bird seed, or pet food. Clothes moths, on the other hand, are drawn to dark, low-traffic areas near wool, upholstered furniture, or stored fabrics. For crawling pests like beetles, position traps on the floor along walls, where they are most likely to travel.
Minimize environmental disruptions. Avoid placing traps near exterior doors, keeping them at least 15–25 feet away to prevent attracting outdoor pests indoors. Strong air currents from vents, fans, or open windows can scatter the pheromone plume, making traps less effective. Direct sunlight and heat from appliances can degrade pheromones faster. Also, steer clear of areas with competing scents like lavender sachets or essential oils, as these can interfere with the trap's effectiveness.
Once you've chosen the right spots, proper spacing and using a Quarterly Pest Remedy Kit are the next steps to ensure maximum effectiveness.
Space Traps Properly
Stick to a spacing guideline of 25–50 feet for most flying insects when arranging traps in a grid pattern. This prevents pheromone plumes from overlapping, which could confuse pests and reduce the traps' efficiency. For weaker fliers like clothes moths and flour beetles, reduce spacing to 25 feet or less.
Use one pheromone type per area. Mixing different pheromones in the same space can confuse pests and lower the traps' performance. If you’re targeting multiple pest species, assign separate zones for each type of trap and maintain proper spacing between them.
Finally, adjust your trap setup based on the size of the room for better coverage.
Adjust for Room Size
Start with one trap in a standard 12x12 foot room and observe the results. For larger residential areas, aim for three to four traps per 1,000 square feet. In smaller spaces like pantries, one or two traps are usually sufficient.
Consider strategic trap arrangements for stubborn infestations. For pantry moths, try a triangular setup: place one trap inside the pantry and two in nearby open spaces, such as on top of the refrigerator. For clothes moths, use a multi-level approach by placing one trap on the closet rod, another on the floor, and a third about 8–10 feet outside the closet to lure moths from hiding. Ensure traps are not obstructed by clutter or overstuffed closets to allow the pheromone to circulate freely.
How to Maintain and Monitor Your Traps
Check Traps Weekly
Make it a habit to inspect your traps every 7 to 14 days. This schedule helps you track pest activity and spot infestation patterns early. Ethan Estabrook, a Research Entomologist at Insects Limited, highlights why this timing matters:
"Generally, pheromone monitors should be serviced on a 7 or 14-day schedule. Many stored product insects complete their life cycle within a month, so a monthly service visit only collects one data set per generation."
During each inspection, log the number of pests caught to monitor trends. Use a popsicle stick to remove trapped insects and refresh the sticky surface for new captures.
If more than 50% of the trap's surface is covered with insects, dust, or debris - or if the adhesive is no longer effective - replace the trap base right away. In areas prone to dust, you may need to check traps more often, as airborne particles can quickly reduce their effectiveness by allowing pests to escape.
Once you've cleared the traps and recorded your findings, check for expired lures or worn-out components and replace them as needed.
Replace Lures and Traps
Lures should be replaced every 60 to 90 days, but in high-temperature or low-humidity environments, swap them out every 4 to 6 weeks using a bi-monthly pest remedy kit. Always mark the traps with the installation date to keep track. If the trap base is still sticky but the lure has expired, simply add a fresh lure to the existing setup.
When handling lures, use disposable gloves or tweezers to avoid cross-contamination. Store unused lures in a sealed container in the refrigerator or freezer - they can last up to a year this way. Be sure to wash your hands thoroughly after handling lures to avoid transferring scents.
Once the traps and lures are in good shape, focus on keeping the surrounding area clean to maximize effectiveness.
Clean the Surrounding Areas
Dust can severely reduce the effectiveness of your traps. Regularly clean nearby surfaces with mild detergents, avoiding strong-smelling products that might interfere with the pheromones.
To ensure pheromones work as intended, remove competing food sources. Seal or discard any infested products and vacuum storage areas to eliminate eggs and larvae. This keeps the environment clear for proper pheromone dispersion.
Safety and Effectiveness Tips
Keep Traps Away from Children and Pets
While pheromone traps are non-toxic, handling them requires some care. Use disposable gloves when working with the lures to prevent pheromones from transferring to your skin or clothing, which could unintentionally attract pests. The National Pesticide Information Center offers this advice: "Keep traps out of reach of children and pets" and "Wash your hands after using pheromones, as pests may follow you if you smell like one of their own". Place traps at eye level or between 3 and 8 feet high in areas with minimal activity, such as closets or pantries. Also, ensure they’re positioned at least 15 feet away from exterior doors to avoid interference.
Don't Mix with Other Pest Control Methods
Using other pest control products too close to pheromone traps can reduce their effectiveness. Patrick Kelley, President of Insects Limited, explains: "A pheromone trap competing with large quantities of pheromone in the air from mating disruption products will capture less insects simply because it is harder for an insect to locate the source of the pheromone". Additionally, strong chemical odors or nearby HVAC vents can disrupt the pheromone plume, making it harder for pests to locate the trap. If you need quicker results while monitoring, consider applying residual insecticides in areas away from your traps. Combining traps with a broader pest management plan can further improve their effectiveness.
Use Remedy's DIY Pest Control Kits

For a more comprehensive approach, pair pheromone traps with an integrated pest management strategy. Ethan Estabrook, Research Entomologist at Insects Limited, emphasizes: "Pheromone monitors are meant to be used as a monitoring tool as part of an integrated approach to pest management. By themselves, pheromone monitors do not eliminate an insect outbreak". Remedy offers DIY pest control kits designed to complement your traps. These kits include professional-grade products that are safe for children and pets, along with clear instructions tailored to your specific needs. They also provide virtual support to help with pest identification and understanding lifecycles. With regular shipments, you’ll always have the right tools ready when your traps signal it’s time to act.
How to Assemble a Large Plastic Delta Trap
Conclusion
Properly setting up pheromone traps is key to effective pest monitoring. Getting the pest identification right is crucial - using the wrong lure for an incorrectly identified pest won’t catch anything.
Place traps at eye level in areas with high pest activity, such as pantries or closets, while avoiding locations that might attract outdoor pests. Check traps weekly or bi-weekly, replace lures every 60–90 days, and swap out traps when more than half of the adhesive surface is covered.
Diane Brown from Michigan State University Extension emphasizes:
"Pheromone traps are an important IPM tool to track moth catches and evaluate pest pressure... however, the traps are not a substitute for visual inspection".
These traps help pinpoint where pest issues are occurring and measure their severity. For a comprehensive pest management approach, combine traps with regular cleaning, removal of infested items, and targeted treatments. To make this process easier, we provide DIY pest control kits with professional-grade, family-safe products, detailed instructions, virtual pest identification support, and scheduled shipments. This ensures you’re always ready to respond to changes in pest activity and keep your strategy effective.
FAQs
Why isn’t my pheromone trap catching anything?
If your pheromone trap isn’t delivering the results you expected, there could be a few reasons behind it. Common issues include placing the trap in the wrong location, using a lure that doesn’t match the target pest, or unfavorable conditions in the surrounding area.
To get better results, make sure to position the trap where the pests are most active. Also, double-check that the lure is specifically designed for the pest you're targeting. Finally, follow guidelines tailored to your local environment to ensure the trap functions as intended.
How many traps should I use in my home?
The number of pheromone traps you'll need varies based on the size of your home and the extent of the pest problem. For smaller areas, around 3 to 4 traps per 1,000 square feet should do the trick. If you're dealing with a larger space, position traps in a grid pattern, spacing them about 25 to 50 feet apart to ensure thorough coverage. You may need to adjust this setup depending on how severe the infestation is and the layout of your home.
When should I switch from monitoring to treatment?
When you observe persistent pest activity or population levels that could pose a risk to your home, it's time to shift from monitoring to treatment. Pay attention to trap catches, pest behavior, and biofix or threshold indicators to decide the best moment to take action. These tools help you address the issue promptly and effectively.